Building a Real-Time Sentiment Analysis Pipeline with AWS

Introduction
Welcome back to my AWS journey! In this blog, I’ll be diving into a real-time sentiment analysis pipeline built with AWS. As I continue working towards my AWS Developer Associate certification, I’m excited to share what I’ve learned so far.
I’ll guide you through how to use AWS services like Lambda, Comprehend, Firehose, and QuickSight to transform raw data into actionable insights in real-time. Plus, I’ll be deploying everything using AWS SAM (Serverless Application Model), so you can see just how easy it is to build and manage serverless applications.
Whether you’re looking to enhance user experience, track social media sentiment, or simply explore the world of serverless, this blog will show you how to create a scalable and efficient sentiment analysis pipeline from scratch. 🚀
All code can be find here
Prerequisites
Before we dive into the tutorial, make sure you have an AWS account and have installed AWS Amplify and SAM (Serverless Application Model) on your local machine. The setup is fairly simple, but just in case you need assistance, here are one helpful link:
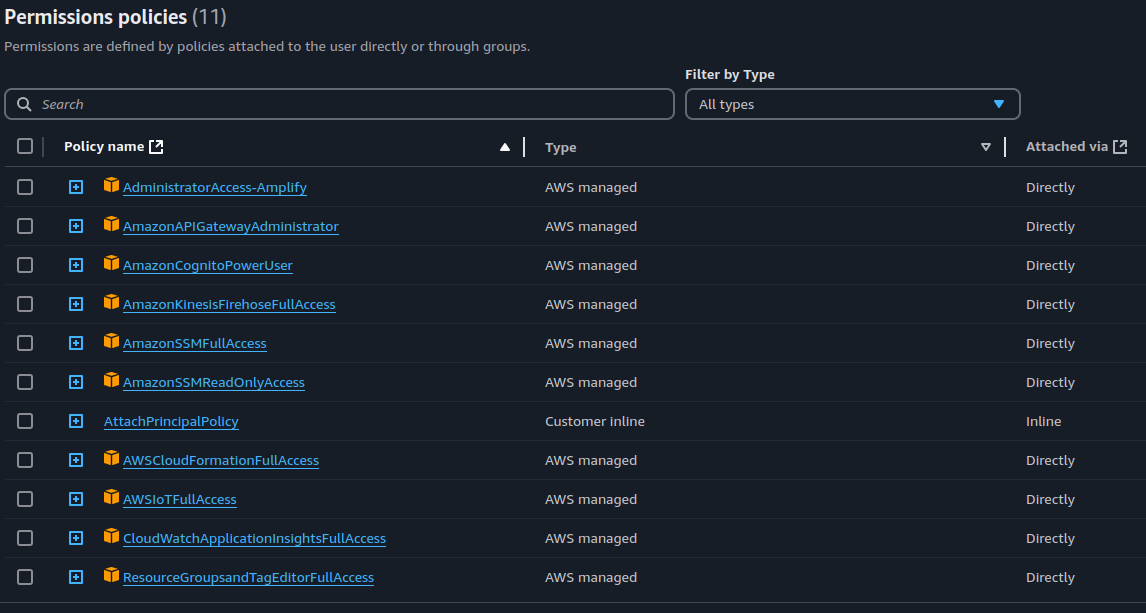
To use SAM for deploying this services, your sam client need to need at least this policies:
Once you have everything set up, you’re ready to follow along!
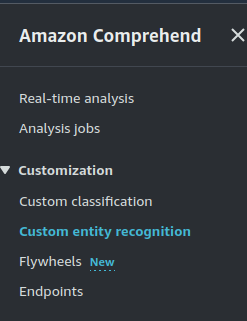
AWS Comprehend
AWS offers a wide range of AI services, including Amazon Rekognition, Amazon Bedrock, Amazon Lex, and Amazon Comprehend, among others. In this section, I’ll focus on Amazon Comprehend, specifically the real-time analysis feature used in this project—not going into every feature it offers.
Here’s a brief overview of the key services provided by Amazon Comprehend:
-
Analyze Jobs: This feature allows you to analyze documents stored in Amazon S3 for various insights, such as entities (events, phrases), language detection, sentiment analysis, targeted sentiment, and personally identifiable information (PII).
-
Custom Classification: Classify documents using categories that you create based on your specific needs.
-
Custom Entity Recognition: Train a custom model to identify specific entities in text, like names, dates, or locations. You’ll need sample documents and a list of entity annotations for training. Once trained, this model can be used to recognize these custom entities in real-time or at scale via batch processing.
-
Flywheel: This resource helps automate the continuous training of models for custom classification and entity recognition, keeping your models up-to-date.
-
Endpoints: Create and manage custom endpoints for real-time classification or entity detection. These endpoints allow you to apply your custom models in real-time, making them available for direct integration into applications.
And also real-time analise that I will delve more in the next section
Real-Time Analise
Imagine a global retail chain that collects customer feedback through online surveys, product reviews, and social media comments. With thousands of feedback submissions coming in daily, manually analyzing and extracting meaningful insights is nearly impossible. By leveraging AWS Comprehend, the company can automatically analyze the text data in real-time. Let’s walk through some examples below.
Here’s the text we’re analyzing:
Yesterday I visited the Edinburgh city center gym, and it was an awesome experience. The lockers were very spacious, which is nice, and the bathroom was clean. The gym had a lot of cool machines, and I had plenty of space to do my exercises. I also tried the pool, which had a lovely view, but the water was a bit cold. The only thing I didn’t like was that there were no gluten-free snacks, and the water fountain was empty. Overall, it was a good experience.
- Entities:

In this case, AWS Comprehend detects entities in the text, such as the gym name, product types, or locations. For example, identifying mentions of product managers or customer service representatives could help link specific feedback to the right team members. This makes it easier to address customer concerns promptly.
- Key Phrases:
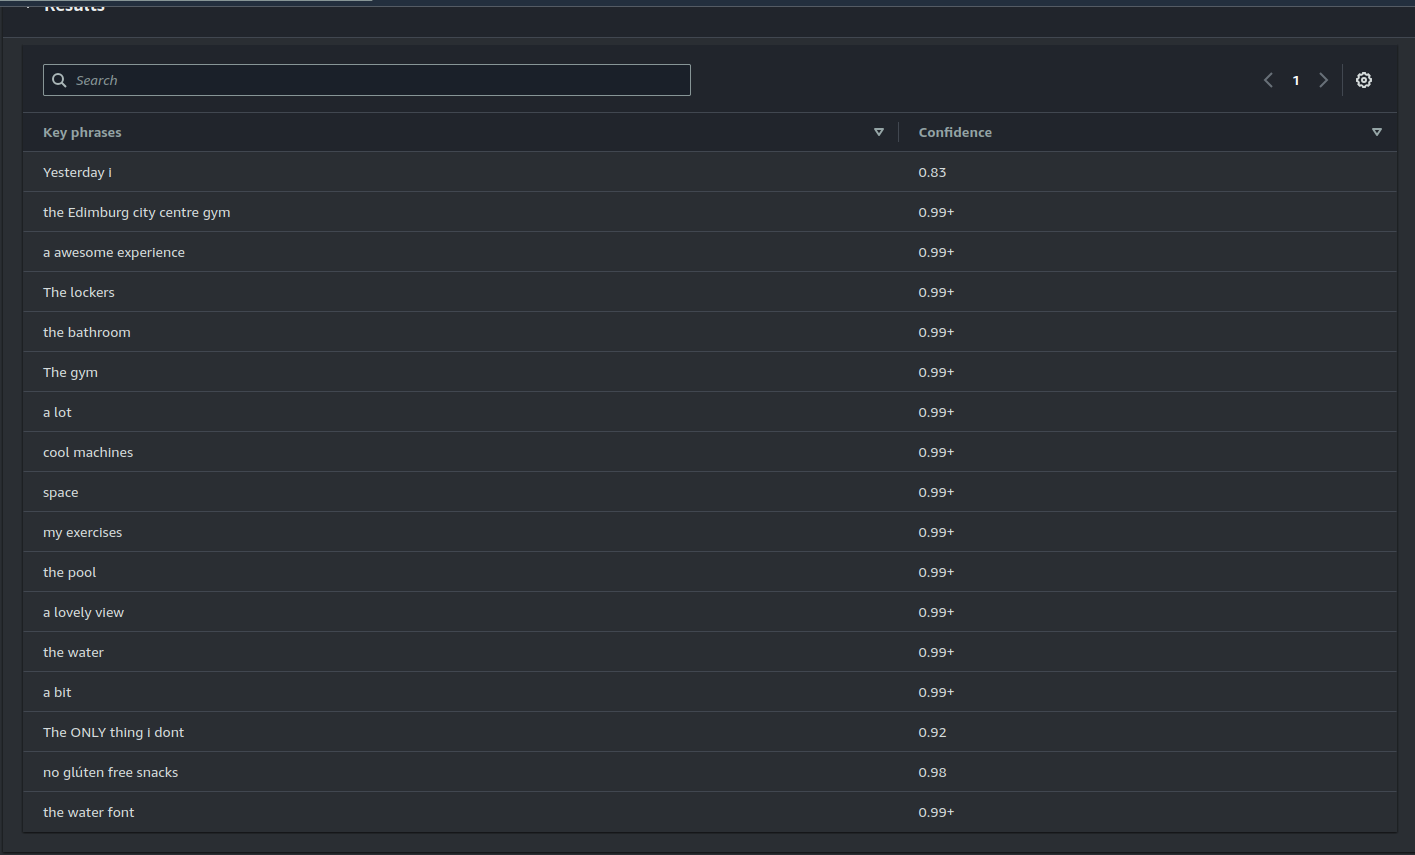
Key phrases are terms or groups of words that represent the main themes or concepts in a text. By extracting key phrases, AWS Comprehend allows you to quickly understand the subject matter without reading everything in detail. In customer reviews, key phrases might include terms like “fast delivery,” “poor quality,” or “easy-to-use.”
For example, if you’re managing an e-commerce platform that sells electronics, AWS Comprehend can identify key phrases like:
- “battery life”
- “screen resolution”
- “customer service”
From these insights, you might discover:
- If “battery life” is mentioned often, it could either highlight a major strength or an ongoing concern.
- If “screen resolution” is frequently discussed, you could determine whether customers are satisfied or if there’s room for improvement.
- Frequent mentions of “customer service” may signal areas to improve in your support team’s training.
These insights can help you prioritize product improvements, improve customer service, or tailor marketing strategies based on feedback.
- Language:
AWS Comprehend can detect the language of the text, enabling you to route the data to appropriate translation tools if necessary (e.g., translating into English for further analysis).
- PII (Personally Identifiable Information):
Many industries face strict data privacy regulations that require them to protect sensitive information. These regulations include:
- GDPR (General Data Protection Regulation) in Europe
- CCPA (California Consumer Privacy Act) in California
- HIPAA (Health Insurance Portability and Accountability Act) in U.S. healthcare
AWS Comprehend’s PII detection helps companies identify and redact sensitive personal information in customer-facing content, ensuring they comply with privacy laws. For example, a financial institution might scan emails or chat logs for sensitive data like bank account numbers or Social Security numbers, removing this information before storing it for analytics.
Sentiment Analysis:
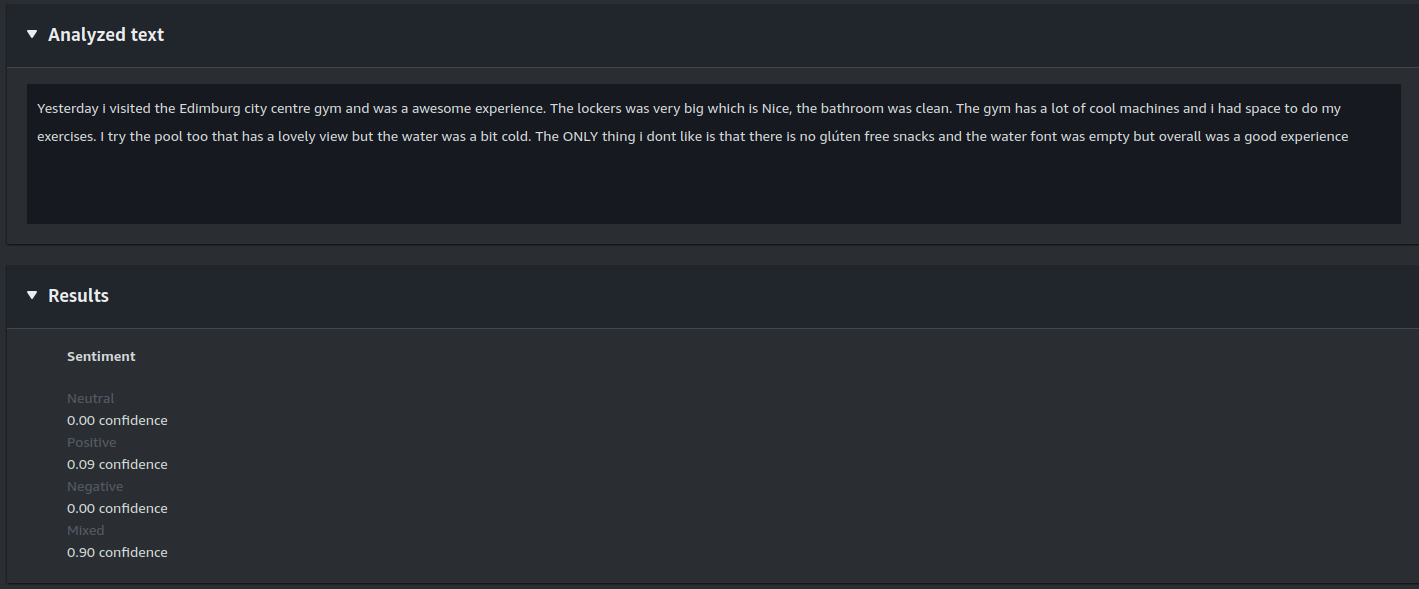
The sentiment analysis on this comment shows a mixed sentiment. This feature provides an overall sentiment for the text—whether it’s positive, negative, or neutral.
Targeted Sentiment:
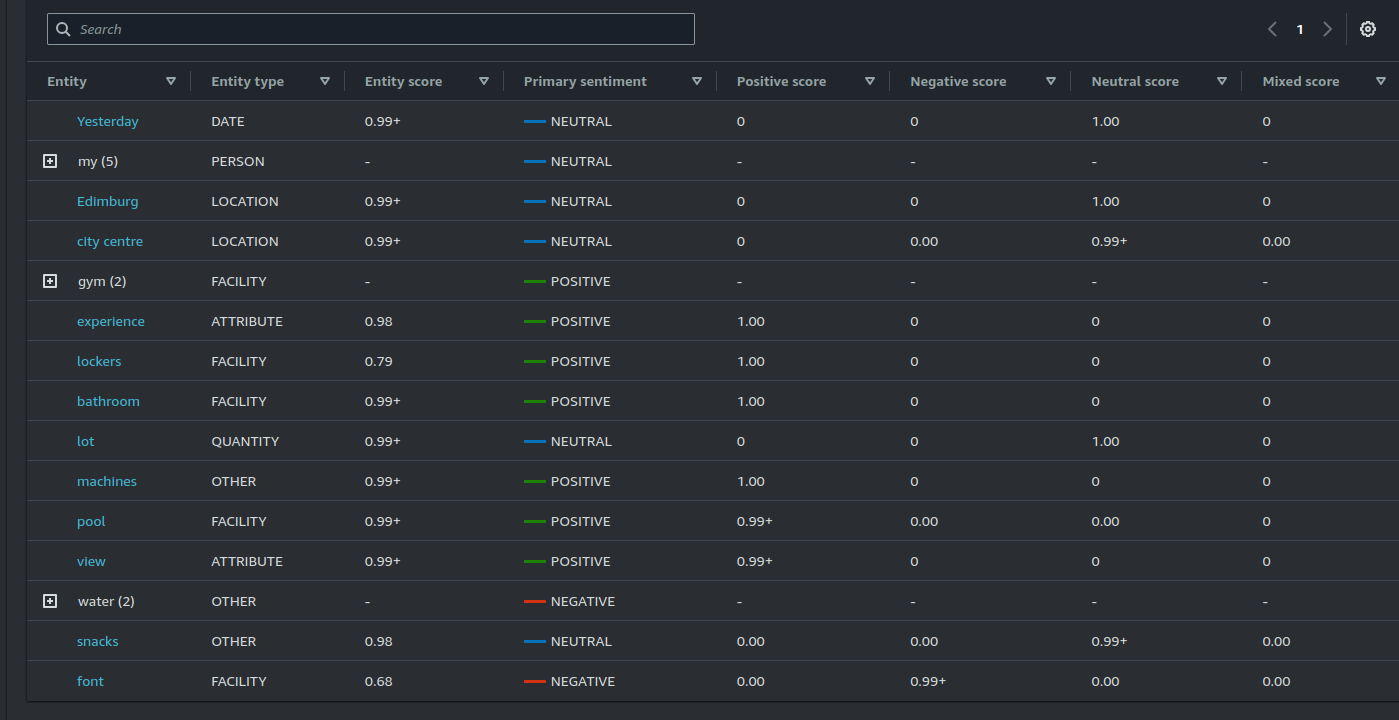
Targeted sentiment analysis goes beyond providing an overall sentiment and focuses on specific entities within the text. In our example, the analysis breaks down which aspects of the gym experience (e.g., the pool, lockers, gluten-free snacks) are viewed positively or negatively.
This feature is particularly useful for identifying specific issues or opportunities linked to different aspects of a product or service. For instance, a gym could use it to understand that their pool area is well-received, while the lack of gluten-free snacks could be seen as a negative.
When combined with other features like key phrase extraction, targeted sentiment analysis gives businesses a deeper, more actionable understanding of customer feedback. This is the feature I’m using in this blog. I won’t go into too much detail about correlating data, as the focus here is more on the integrations and how to implement them with AWS.
How companies use AWS Comprehend
This section is for the curious people! 😃 Here are some links where you can see how big companies use AWS Comprehend for sentiment analysis:
SAM (Serverless Application Model)
API
 Api:
    TracingEnable: true
    Type: AWS::Serverless::Api
    Properties:
      StageName: v1
      Auth:
        Authorizers:
          CognitoAuthorizer:
            Type: CognitoAuthorizer
            AuthorizationScopes:
              - email
              - openid
              - profile
            UserPoolArn: !Sub arn:aws:cognito-idp:${Region}:${AccountId}:userpool/${Region}${UserPool}
        DefaultAuthorizer: CognitoAuthorizer
This configuration will deploy a new API with a Cognito-based authorization setup. By default, access to the API endpoints will be restricted to authenticated users who have a valid JWT token issued by the Cognito User Pool specified above.
To better understand how authentication and authorization work with Cognito, feel free to check out my previous post, where I go into detail on how Cognito operates.
Lambda function invoke by api call
 ProcessCommentAnalysis:
    Type: AWS::Serverless::Function
    Metadata:
      BuildMethod: makefile
      BuildTarget: build-ProcessCommentAnalysis
    Properties:
      CodeUri: .
      Handler: bootstrap
      Runtime: provided.al2
      Architectures:
        - x86_64
      Events:
        AnalyzeComments:
          Type: Api
          Properties:
            Method: POST
            Path: /analyze-comments
            RestApiId: !Ref Api
      Policies:
        - Statement:
            - Effect: Allow
              Action:
                - comprehend:DetectTargetedSentiment
              Resource: '*'
            - Effect: Allow
              Action:
                - cloudwatch:*
                - logs:*
                - firehose:PutRecord
                - firehose:PutRecordBatch
              Resource:
                - !GetAtt Firehose.Arn
This configuration sets up a Lambda function that will be triggered whenever the /analyze-comments endpoint is called. The function is straightforward: it takes the request payload, invokes AWS Comprehend, and sends the response directly to Firehose. You can see the implementation under lamba/ProcessCommentAnalysis
To ensure the Lambda function has the necessary permissions, the policies above include comprehend:DetectTargetedSentiment and firehose:PutRecord. These are required for the function to interact with Comprehend and Firehose respectively.
Firehose: Streaming Comments Analysis to S3 🚀
########## KINESIS DATA FIREHOSE ###########
  Firehose:
    Type: AWS::KinesisFirehose::DeliveryStream
    DependsOn:
      - DeliveryStreamPolicy
    Properties:
      DeliveryStreamType: DirectPut
      DeliveryStreamName: "kdf-firehose-78872folgado"
      ExtendedS3DestinationConfiguration: # where data is delivery
        BucketARN: !GetAtt DeliveryBucket.Arn
        RoleARN: !GetAtt DeliveryStreamRole.Arn
        ProcessingConfiguration: # will do transformations on the data
          Enabled: true
          Processors:
            - Type: Lambda
              Parameters:
                - ParameterName: LambdaArn
                  ParameterValue: !GetAtt TransformationFunction.Arn # the lambda function that will process the data
        BufferingHints:
          IntervalInSeconds: 60
          SizeInMBs: 1
        CloudWatchLoggingOptions:
          Enabled: true
          LogGroupName: "/aws/kinesisfirehose/ibcd"
          LogStreamName: "S3Delivery"
        EncryptionConfiguration:
          NoEncryptionConfig: "NoEncryption"
        Prefix: ""
Now, let’s talk about Amazon Kinesis Data Firehose, our real-time data delivery pipeline. Is it overkill for this gym review use case? Absolutely. Could we just have our Lambda write directly to S3? For sure. But hey, this is about learning serverless integrations, so let’s roll with it! 😆
How It Works
After our Lambda function (ProcessCommentAnalysis) extracts sentiment insights using AWS Comprehend, it sends the results straight into Firehose. Here’s what happens next:
- Firehose buffers incoming data until it either reaches 1MB or 60 seconds have passed—whichever comes first.
- At that point, Firehose calls our transformation Lambda (TransformationFunction), applying the transformation to all accumulated records at once (not individually!).
- The transformed data is then stored in S3, ready for visualization in Amazon QuickSight or further analysis.
Firehose Configuration
Firehose is set up as a DirectPut stream, meaning Lambda sends records directly. Here are its key components:
- ExtendedS3DestinationConfiguration → Saves transformed data in S3.
- ProcessingConfiguration → Calls a Lambda function to format the data before storage.
- BufferingHints → Ensures records are processed in batches (1MB or 60s intervals).
- CloudWatchLoggingOptions → Logs Firehose activity for debugging (because things will go wrong).
When Firehose Makes Sense 🏆
WWhile Firehose might be overkill for our gym reviews, it shines in high-throughput, real-time streaming scenarios like:
-
Clickstream analytics: Processing user interactions from websites or apps.
-
IoT data pipelines: Handling sensor data from connected devices.
-
Log aggregation: Streaming logs from multiple sources into a centralized store.
-
Security event monitoring: Forwarding security logs to SIEM tools for analysis.
So while this setup may be excessive now, it’s a great hands-on way to understand event-driven architectures. And who knows? Maybe one day your gym reviews will go viral, and you’ll be glad you built for scale! 💪🔥
Things You Really Need to Know About Kinesis Firehose 🚀
Transformation error handling
Taking a closer look at our transformation Lambda function, you’ll notice that it returns specific status codes based on the outcome:
-
KinesisFirehoseTransformedStateOk → The record was processed successfully.
-
KinesisFirehoseTransformedStateDropped → The record was dropped due to an error.
-
KinesisFirehoseTransformedStateProcessingFailed → The record failed processing.
When a record is marked as ProcessingFailed, Firehose treats it as unsuccessfully processed. These records are automatically sent to an S3 bucket under the processing-failed folder.
To illustrate this, I intentionally caused some records to fail. As seen in the image below, Firehose created a processing-failed folder:
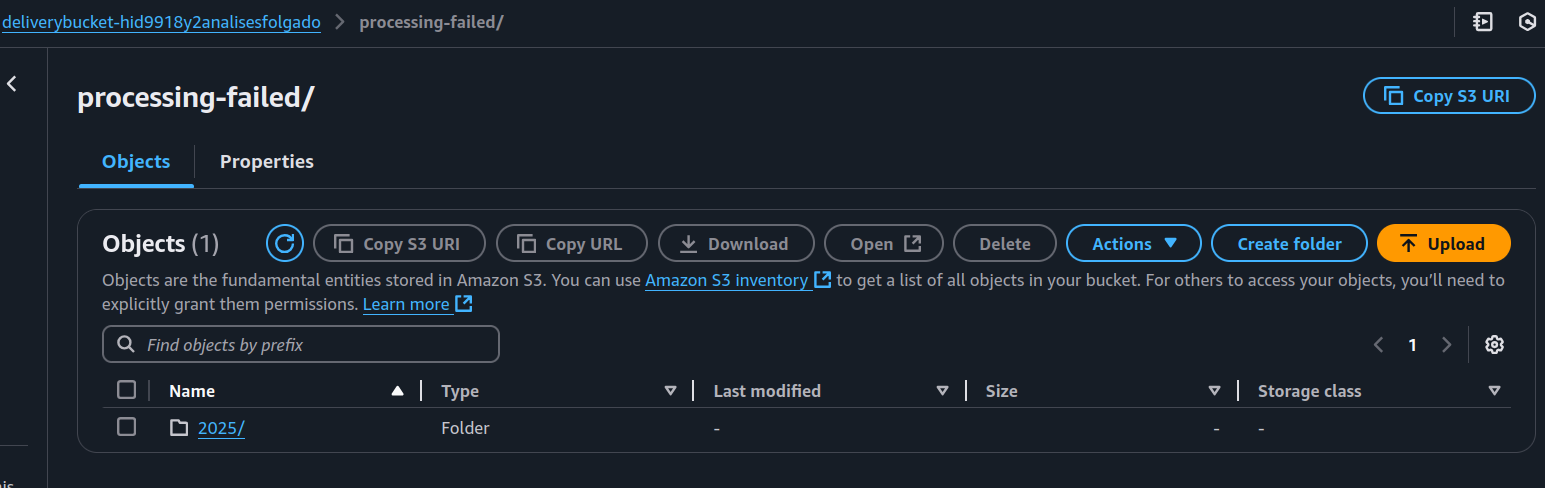
Examining the folder contents, we find objects containing the following structure:
{"rawData":"=",
"errorCode":"Lambda.InvokeAccessDenied",
"errorMessage":"",
"attemptsMade":,
"arrivalTimestamp":1740222324567,
"attemptEndingTimestamp":1740222399984,
"lambdaARN":""}
This JSON provides key debugging details:
-
Error Code: The specific failure reason.
-
Attempts Made: How many times Firehose retried the function.
-
Arrival & Attempt Timestamps: When the record was received and when the final processing attempt occurred.
-
Raw Data: The original input (Base64 encoded) that the transformation Lambda received.
Why This Matters
Understanding Firehose’s error-handling behavior ensures that failed records are not silently lost. By storing unsuccessful records in a dedicated S3 folder, we can diagnose issues, fix bugs, and reprocess records if needed (of course we could use other ways to do it)
By leveraging Firehose in this way, we not only streamline data processing but also gain a robust mechanism for tracking and resolving errors. 🚀
Be Mindful of Lambda Timeouts ⏳
Setting the right timeout for your transformation Lambda is critical. Remember:
-
Firehose invokes the function for every incoming record, meaning the processing time can vary significantly depending on the data volume.
-
If your stream is small, the Lambda will execute quickly. But with large streams, processing can take much longer.
-
AWS Lambda has a hard limit of 15 minutes per execution, so keep that in mind when designing complex
To strike the right balance, benchmark your Lambda’s execution time under different workloads and adjust the timeout accordingly.
Decide Buffering Hints Wisely 💡
Firehose buffers data before delivery using BufferingHints, which define:
-
SizeInMBs: The amount of data Firehose collects before sending it.
-
IntervalInSeconds: The maximum time Firehose waits before delivering the buffer, even if it’s not full.
In my case, I configured Firehose with a 1MB buffer and an interval of 60 seconds. Now, imagine that my average data payload is only 500KB per interval—I’m always underutilizing the buffer. Since Firehose charges based on the total ingested data, not actual usage, I’m effectively paying for unused space! 😬
How to Optimize Buffering Hints
1- Analyze Your Data Throughput: If your data flow is consistently below the buffer size, consider lowering SizeInMBs to minimize wasted space.
2- Adjust the Buffer Interval: If you need faster data delivery, reduce IntervalInSeconds to push smaller batches more frequently.
3- Match Buffering to Downstream Processing Needs: If your target system (S3, Redshift, etc.) prefers larger, less frequent writes, a higher buffer size is ideal. If real-time insights matter more, a lower buffer size with a shorter interval works best.
💰 Cost-saving tip: If your data trickles in slowly, Firehose will still wait until IntervalInSeconds is reached before delivering. If you’re consistently underutilizing the buffer, consider alternative approaches like Kinesis Data Streams + Lambda, which provide more fine-tuned control.
More about the pricing here
Happy streaming! 🚀
Policies: The Necessary Evil 🛑😂
DeliveryStreamPolicy:
    Type: AWS::IAM::Policy
    Properties:
      Roles:
        - !Ref DeliveryStreamRole
      PolicyName: firehose_delivery_policy
      PolicyDocument:
        Version: 2012-10-17
        Statement:
          - Effect: Allow
            Action:
              - 's3:AbortMultipartUpload'
              - 's3:GetBucketLocation'
              - 's3:GetObject'
              - 's3:ListBucket'
              - 's3:ListBucketMultipartUploads'
              - 's3:PutObject'
            Resource:
              - !GetAtt DeliveryBucket.Arn
              - !Join
                - ''
                - - 'arn:aws:s3:::'
                  - !Ref DeliveryBucket
                  - '*'
          - Effect: Allow
            Action:
              - 'lambda:InvokeFunction'
            Resource:
              - !GetAtt TransformationFunction.Arn
          - Effect: Allow
            Action:
              - 'cloudwatch:*'
              - 'logs:*'
            Resource: '*'

  DeliveryStreamRole:
    Type: AWS::IAM::Role
    Properties:
      AssumeRolePolicyDocument:
        Version: 2012-10-17
        Statement:
          - Sid: ''
            Effect: Allow
            Principal:
              Service: firehose.amazonaws.com
            Action: 'sts:AssumeRole'
What These Policies Actually Do 🔍
1️⃣ Firehose Needs Permission to Write to S3 → This part of the policy makes sure Firehose can put, list, and manage objects in your S3 bucket. Without it, Firehose would be standing at the S3 door knocking with no key. 🚪🔑
2️⃣ Firehose Needs to Call Lambda → Since we’re using a transformation Lambda, Firehose needs permission to invoke it. Otherwise, your data will stay in its raw, unprocessed state, like an unblended protein shake. 🥤
3️⃣ CloudWatch Logging→ This allows Firehose to log events to CloudWatch, so when something inevitably breaks, you have clues about why. Think of it as security cameras for your data pipeline. 📹
4️⃣ The Firehose Role → AWS needs to know that Firehose is actually allowed to do all of the above. This role gives it the authority to act on your behalf. It’s like giving Firehose an official employee badge. 🏷️
Data Visualization with QuickSight 🎨📊
Now that we have our transformed data in S3, it’s time to bring it to life with Amazon QuickSight!
We’re not going to dive deep into QuickSight’s full capabilities here (because let’s be real, this project is all about streaming data, not BI deep-dives). But trust me, QuickSight is powerful—the NFL even uses it for real-time analytics! 🏈📊
With QuickSight, you can:
-
Build interactive dashboards 📊
-
Use machine learning insights (yes, AI-powered analytics!) 🤖
-
Share visualizations across teams 👥
-
Integrate seamlessly with S3, Redshift, and more 🚀
For our project, we’ll simply use it to visualize the processed gym reviews. That’s it. No fancy ML, no predictive insights—just a clean, clear way to see our data in action. If you’re interested in exploring QuickSight further, go for it! But for now, let’s keep things simple. 😉
QuickSight Setup
It wa really simple to setup. The data was transformen in NDJSON(we will see how after):
{"entity":"gym","type":"FACILITY","sentimental":"POSITIVE"}
{"entity":"app","type":"SOFTWARE","sentimental":"NEGATIVE"}
{"entity":"gym","type":"FACILITY","sentimental":"POSITIVE"}
{"entity":"app","type":"SOFTWARE","sentimental":"NEGATIVE"}
{"entity":"gym","type":"FACILITY","sentimental":"POSITIVE"}
{"entity":"app","type":"SOFTWARE","sentimental":"NEGATIVE"}
{"entity":"gym","type":"FACILITY","sentimental":"POSITIVE"}
{"entity":"app","type":"SOFTWARE","sentimental":"NEGATIVE"}
This structure is QuickSight-friendly, so all you need to do is create a manifest file (already in the repo):
{
    "fileLocations": [
      {
        "URIPrefixes": [
          "s3://deliverybucket-hid9918y2analisesfolgado/2025/02/"
        ]
      }
    ],
    "globalUploadSettings": {
      "format": "JSON",
      "delimiter": ",",
      "textqualifier": "\"",
      "containsHeader": "false"
    }
  }
Then, go to Datasets:
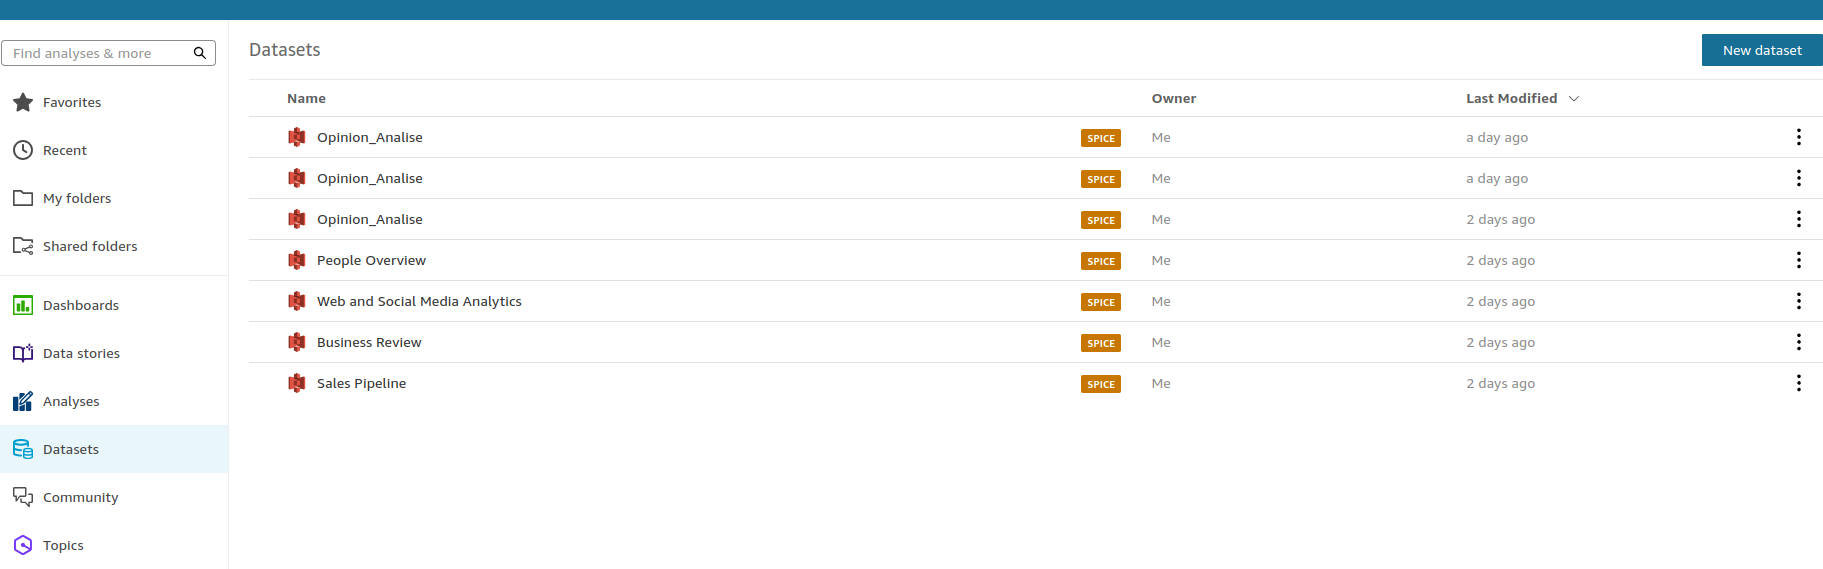
Select New Dataset → S3, then upload your manifest.json file:

And voilà! 🚀 Your data is ready for visualization:
Let’s Dive Into What It Was Built Step by Step
In the sections above I explain more what SAM configuration means and how can we setup quickSight, in this section I will demostrate what was created with the SAM file.
Api Call
To demonstrate how Firehose buffers data, I made two different API calls:
First Call:

Second Call:

These calls return responses from AWS Comprehend. The response contains a lot of information, but let’s simplify it. Suppose the comment was:
The changing rooms are always dirty.
The response would be:
{
  Entities: [
        {
      DescriptiveMentionIndex: [
                0
            ],
      Mentions: [
                {
          BeginOffset: 4,
          EndOffset: 18,
          GroupScore: 1,
          MentionSentiment: {
            Sentiment: "NEGATIVE",
            SentimentScore: {
              Mixed: 0.00015799999528098851,
              Negative: 0.9983959794044495,
              Neutral: 0.00010199999815085903,
              Positive: 0.0013429999817162752
                        }
                    },
          Score: 0.999845027923584,
          Text: "changing rooms",
          Type: "FACILITY"
                }
            ]
        }
    ]
}
What’s Happening Under the Hood? 🔥
Firehose Monitoring

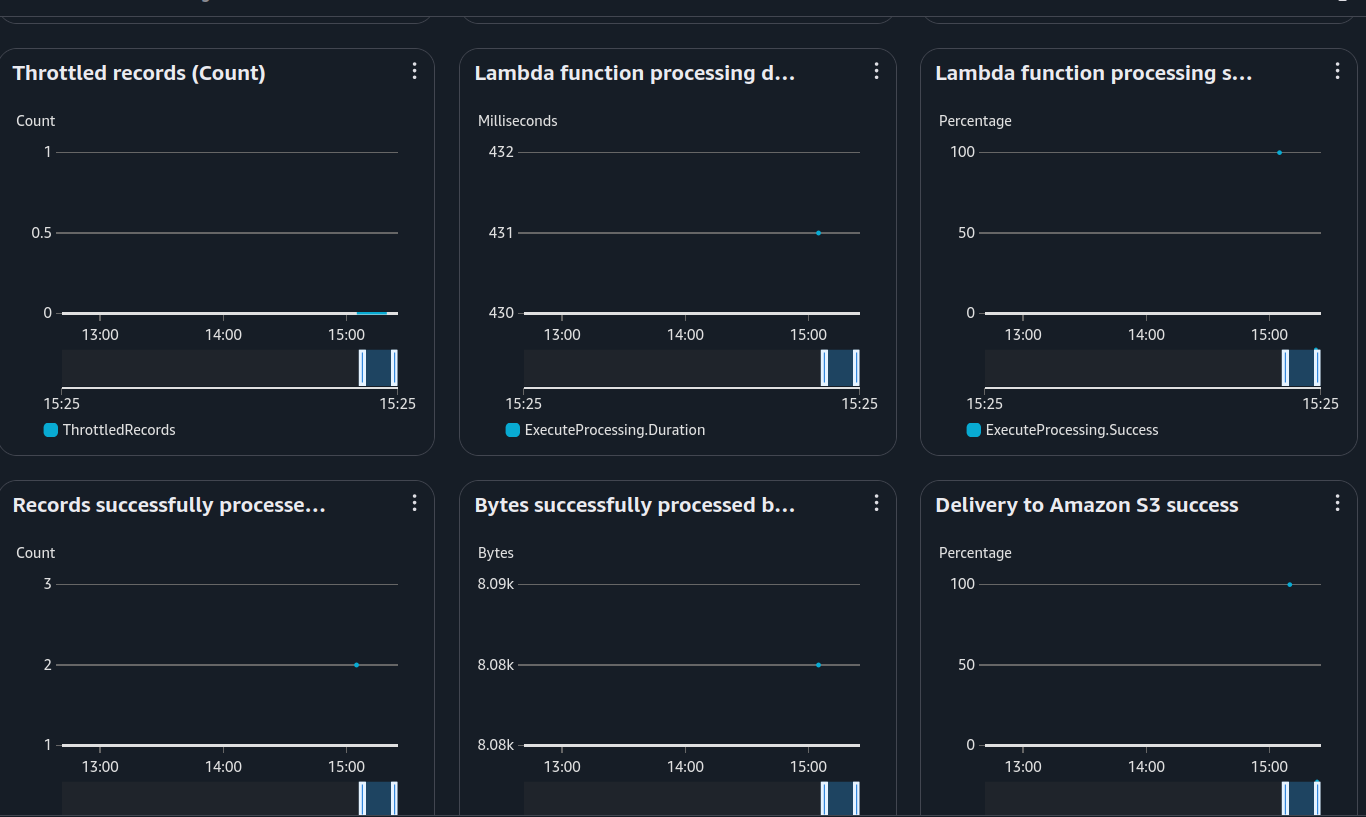
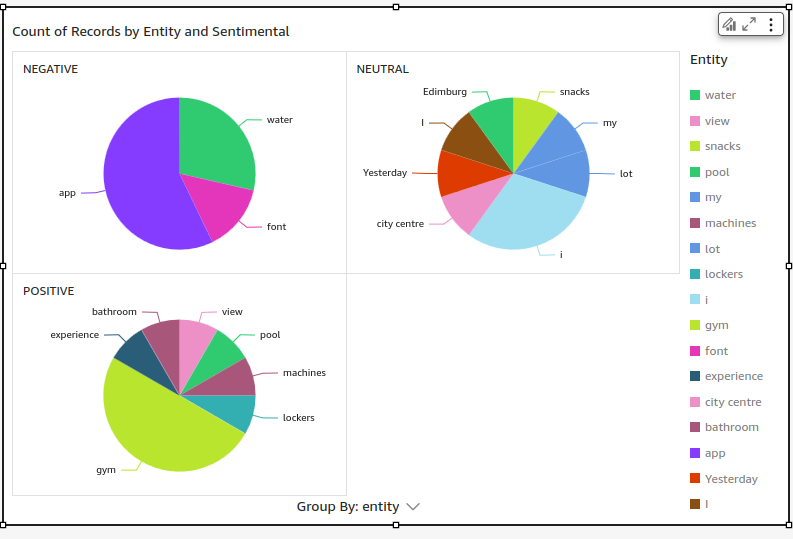
From these charts, we can see:
-
The first image shows a huge difference in incoming bytes. That’s because Firehose buffers 1MB before sending data, but my test calls were just a few KB. Oops. 😆
-
The second image provides details about the Lambda transformation function: execution time, success/failure rates, and processed records.
Firehose Configuration
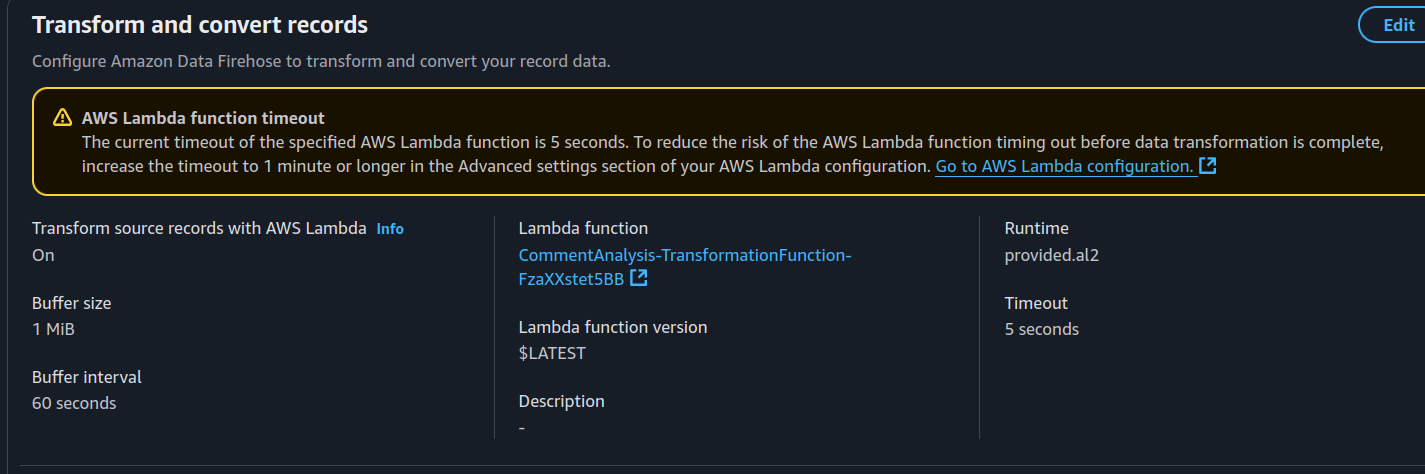
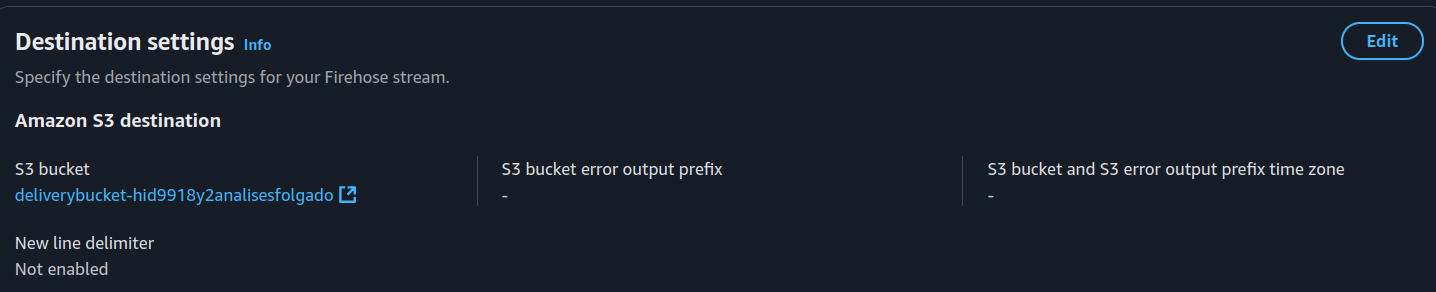
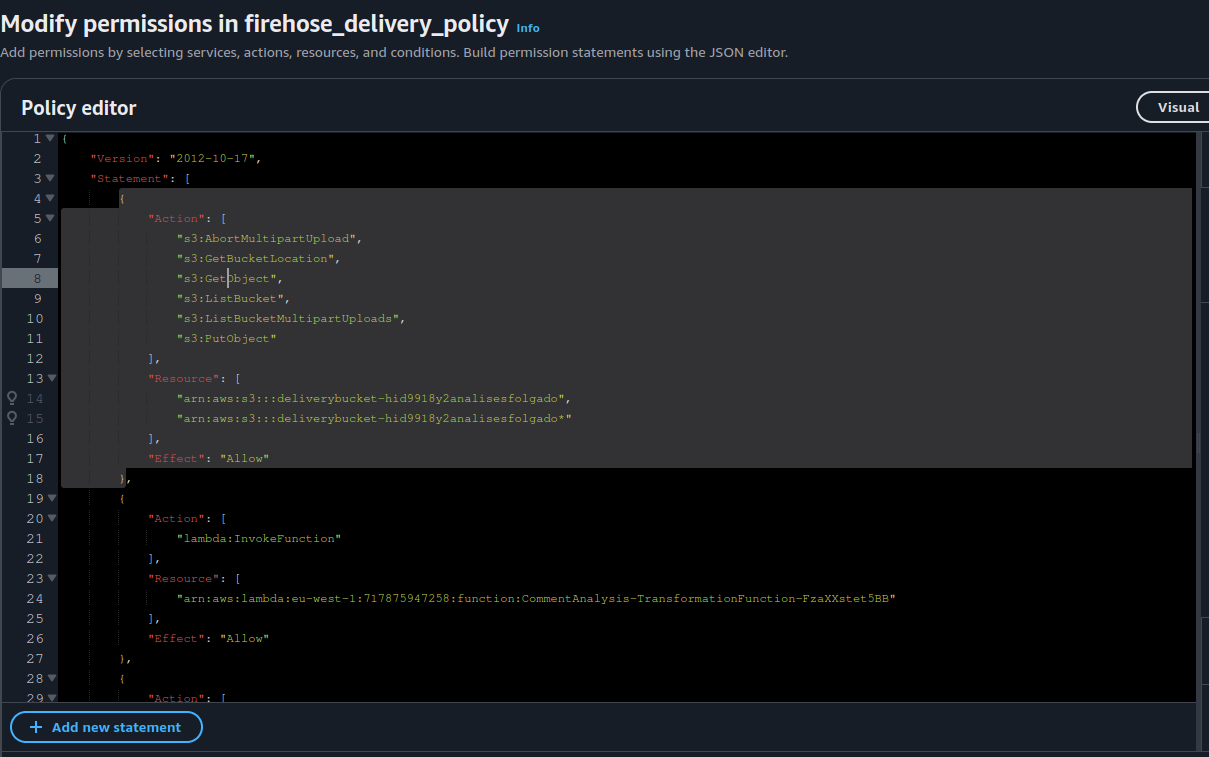
Here’s what we can see:
-
First Image → The relationship between Firehose and the Lambda function that transforms our data.
-
Second Image → The S3 bucket where Firehose delivers processed data.
-
Third Image → The IAM policies created by AWS SAM for our Firehose.
What was save in the S3 Buckets after this 3 calls ?
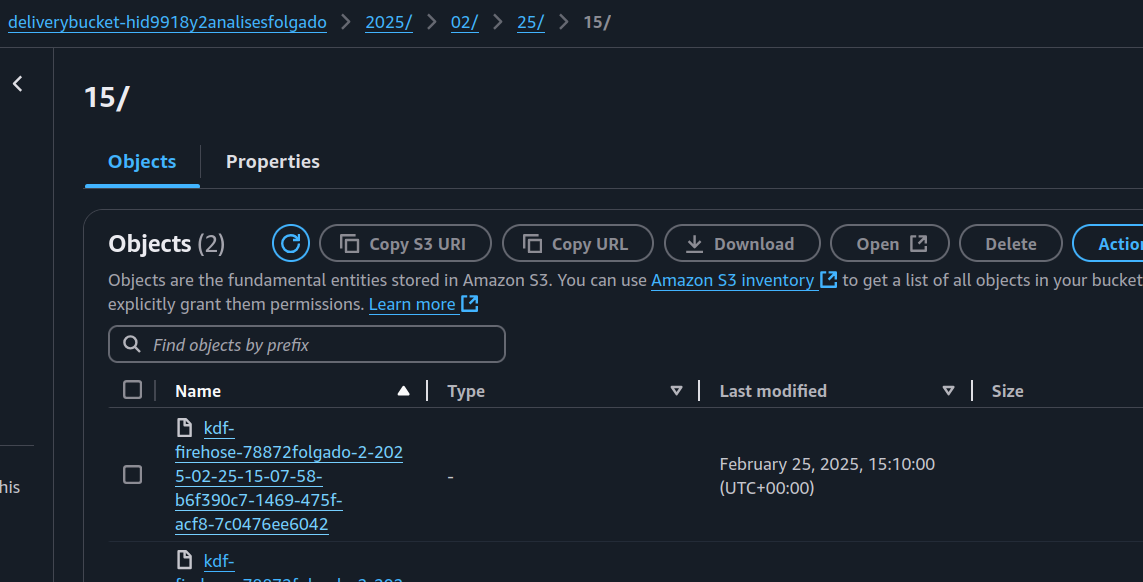
FireHose save the data from the two request on the s3bucket above like this:
{"entity":"Yesterday","type":"DATE","sentimental":"NEUTRAL"}
{"entity":"i","type":"PERSON","sentimental":"NEUTRAL"}
{"entity":"i","type":"PERSON","sentimental":"NEUTRAL"}
{"entity":"my","type":"PERSON","sentimental":"NEUTRAL"}
{"entity":"I","type":"PERSON","sentimental":"NEUTRAL"}
{"entity":"i","type":"PERSON","sentimental":"NEUTRAL"}
{"entity":"Edimburg","type":"LOCATION","sentimental":"NEUTRAL"}
{"entity":"city centre","type":"LOCATION","sentimental":"NEUTRAL"}
{"entity":"gym","type":"FACILITY","sentimental":"POSITIVE"}
{"entity":"gym","type":"FACILITY","sentimental":"POSITIVE"}
{"entity":"experience","type":"ATTRIBUTE","sentimental":"POSITIVE"}
{"entity":"lockers","type":"FACILITY","sentimental":"POSITIVE"}
{"entity":"bathroom","type":"FACILITY","sentimental":"POSITIVE"}
{"entity":"lot","type":"QUANTITY","sentimental":"NEUTRAL"}
{"entity":"machines","type":"OTHER","sentimental":"POSITIVE"}
{"entity":"pool","type":"FACILITY","sentimental":"POSITIVE"}
{"entity":"view","type":"ATTRIBUTE","sentimental":"POSITIVE"}
{"entity":"water","type":"OTHER","sentimental":"NEGATIVE"}
{"entity":"water","type":"OTHER","sentimental":"NEGATIVE"}
{"entity":"snacks","type":"OTHER","sentimental":"NEUTRAL"}
{"entity":"font","type":"FACILITY","sentimental":"NEGATIVE"}
{"entity":"I","type":"PERSON","sentimental":"NEUTRAL"}
{"entity":"I","type":"PERSON","sentimental":"NEUTRAL"}
{"entity":"I","type":"PERSON","sentimental":"NEUTRAL"}
{"entity":"my","type":"PERSON","sentimental":"NEUTRAL"}
{"entity":"gym","type":"FACILITY","sentimental":"NEGATIVE"}
{"entity":"gym","type":"FACILITY","sentimental":"NEUTRAL"}
{"entity":"app","type":"SOFTWARE","sentimental":"NEGATIVE"}
{"entity":"app","type":"SOFTWARE","sentimental":"NEUTRAL"}
In NJSON format, this is the art created by our transform function
QuickSight: Data Visualization on Steroids 📊
Now that our data is NDJSON format, it’s super easy to create QuickSight dashboards. While our example is simple, you can go wild with possibilities: tracking sentiment trends, filtering by gym locations, analyzing user demographics—the sky’s the limit! 🚀
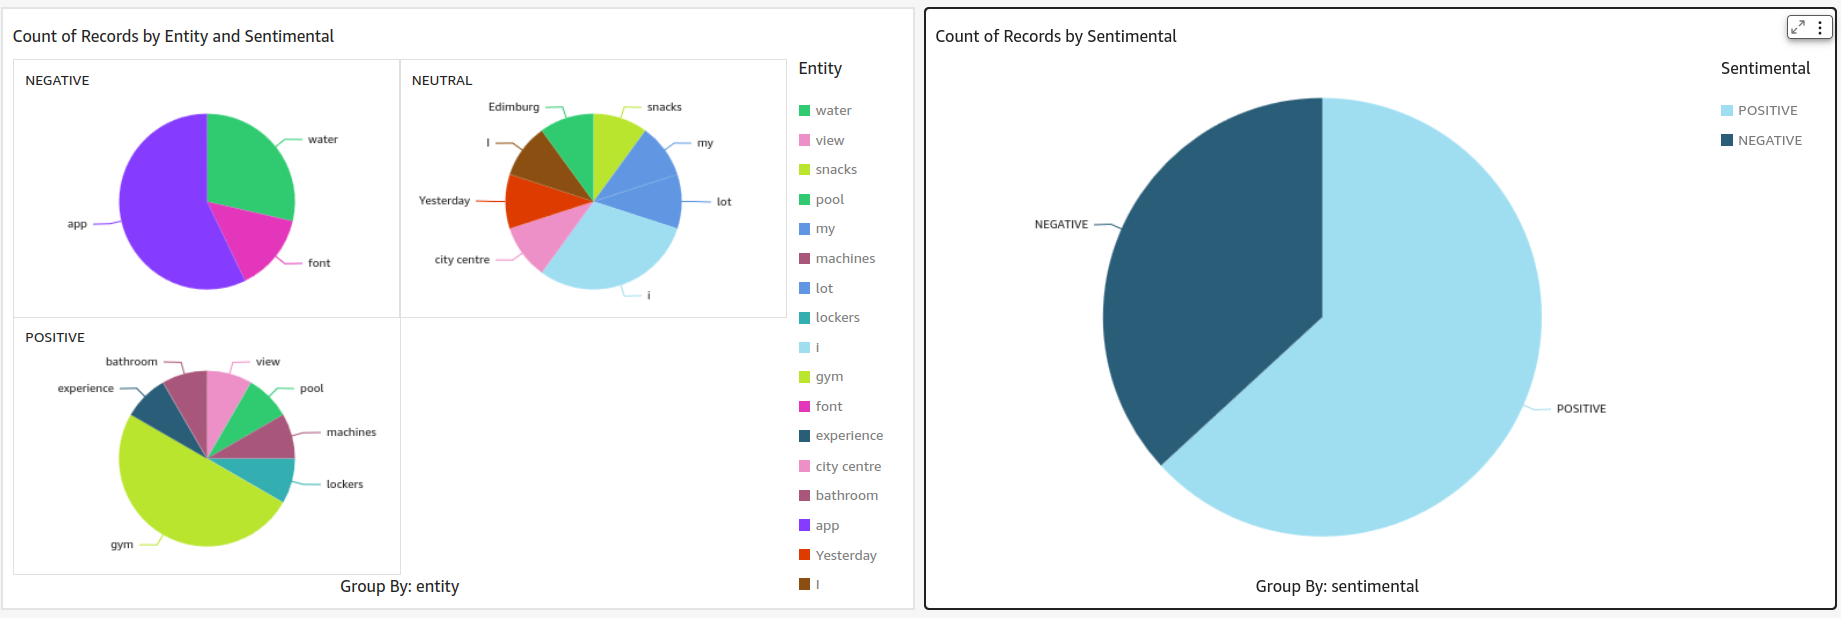
Oh, and did you know you can embed these dashboards into other applications? Imagine pulling up gym sentiment insights right inside your gym’s app!

Conclusion
And that’s a wrap! With just a few AWS services, we built a fully serverless data pipeline that takes user feedback, extracts sentiment insights, stores structured data in S3, and visualizes it in QuickSight—all without managing servers.
Thanks to AWS SAM, deploying everything was incredibly straightforward. Just a few commands and the entire stack—Firehose, Lambda, S3, IAM roles—was up and running. Infrastructure as Code (IaC) for the win! 🏆
While this project was a POC, it highlights how businesses can leverage AWS Comprehend alongside other analytics tools to gain valuable insights from customer feedback. Many big companies already use similar solutions(more complex of course) to improve their services.
This setup can scale beyond gym reviews. Imagine tracking customer sentiment across multiple locations, analyzing trends over time, or combining this data with CRM systems for deep customer intelligence.
So, whether you’re working on a startup idea, enterprise analytics, or just flexing your cloud skills, these tools make real-time insights more accessible than ever.
Now go build something awesome!