Deploying a Secure API Using AWS SAM and Cognito Made Easy
Introduction
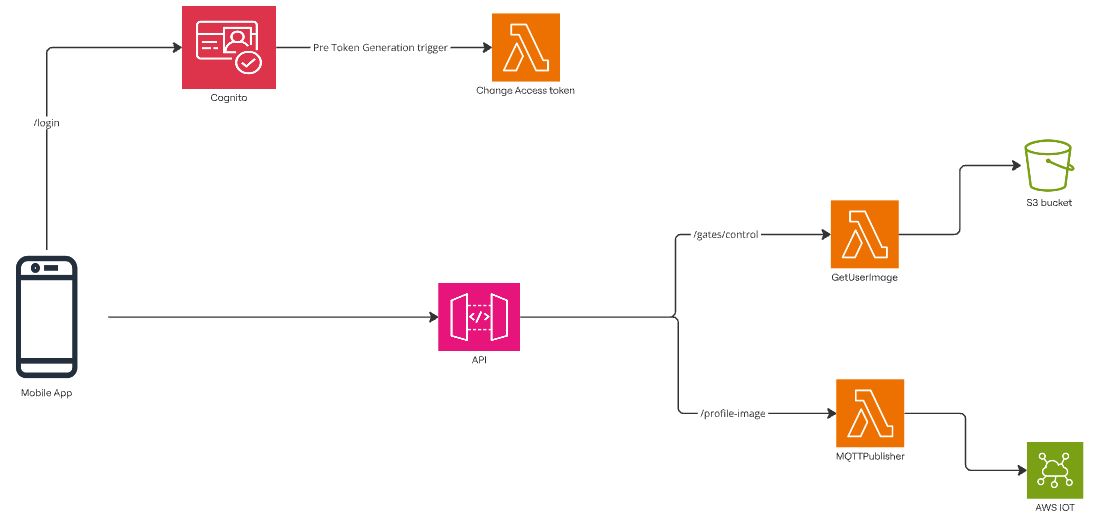
As part of my journey toward earning the AWS Certified Developer certification, I’ve been diving into various AWS services. In this blog, I’ll guide you through setting up a secure API with AWS Cognito for authentication and API Gateway to handle requests. We’ll leverage AWS Lambda to process these API calls, creating a fully serverless architecture.
I’ll also walk you through how to easily deploy both the API and Cognito configuration using AWS SAM (Serverless Application Model) and explain how the API integrates with Cognito for authentication. Additionally, I’ll show you how to use the API to interact with other AWS services, such as publishing messages to AWS IoT MQTT and retrieving images from S3 buckets.
We’ll explore how to add scopes to access tokens to control permissions and restrict access to specific API endpoints. Finally, I’ll demonstrate how AWS Amplify can quickly set up a mobile app with Cognito authentication, and how to enable multi-factor authentication (MFA) with just a few simple steps.
The API will have two endpoints:
- One that triggers a Lambda function to retrieve your profile image from an S3 bucket.
- Another that triggers a Lambda function to publish a message to an AWS IoT topic.
The second endpoint will require admin access, so I’ll also show you how to customize access tokens to manage permissions and enforce role-based access control.
To help you get started, here are two GitHub repositories you can use and follow along with:
- API with SAM and Go: This repository contains the API built using AWS SAM, with a Lambda function written in Go.
- React Native Mobile App: This repository includes a mobile app built with React Native, designed to interact with the API.
Feel free to share any suggestions to make this guide more helpful for others starting similar projects!
Let’s dive in!
Prerequisites
Before we dive into the tutorial, make sure you have an AWS account and have installed AWS Amplify and SAM (Serverless Application Model) on your local machine. The setup is fairly simple, but just in case you need assistance, here are two helpful links:
Although this blog doesn’t focus on IAM roles and permissions, to use SAM, I had to set up a user with the following permissions:
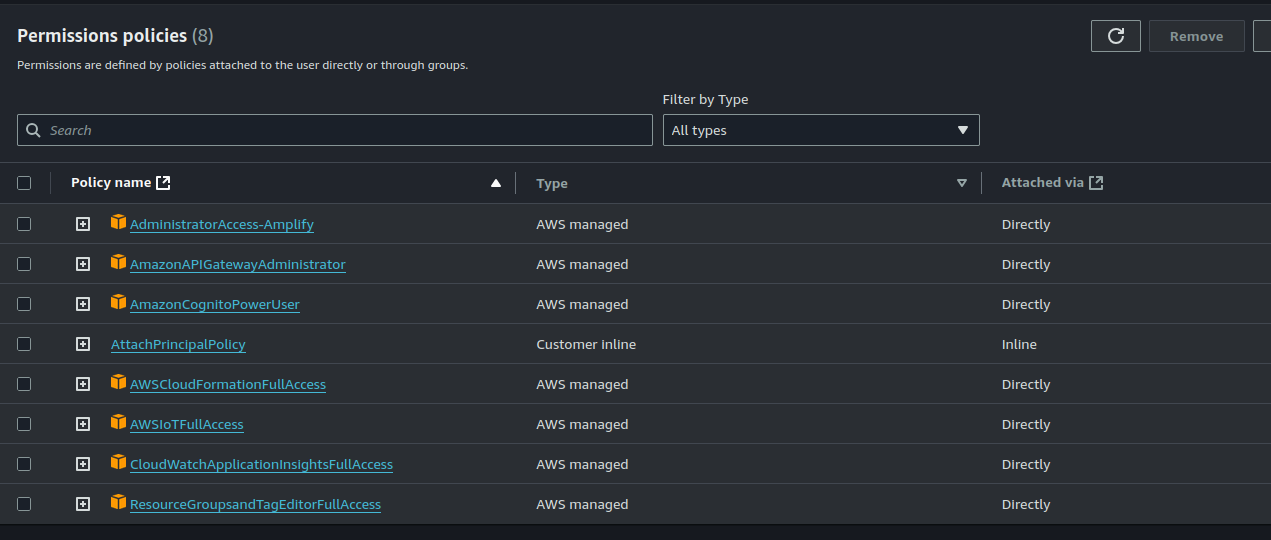
Once you have everything set up, you’re ready to follow along!
SAM (Serverless Application Model)
Setup Cognito
In this section, I’ll guide you through creating an authentication system using AWS SAM and Cognito. While I won’t cover every single detail of the .yml file (because let’s be honest, most of it can be Googled!), I will highlight a few key points that are easy to miss and could save you some headaches. You can find the complete configuration in the cognito folder of the project.
Let’s dive into the most important parts to make sure your setup works smoothly:
- Restricting User Creation
In the template.yml file, you’ll notice this configuration:
AdminCreateUserConfig:
  AllowAdminCreateUserOnly: true
This setting ensures that only admins can create new users, which is perfect for my use case since my app is not meant for public sign-ups. I mean, I don’t really want random people controlling devices in my home, right? 😅 But if you want to allow user sign-ups (like for a public-facing app), simply remove these two lines. 2. User Groups
AdminUserGroup:
  Type: AWS::Cognito::UserPoolGroup
  Properties:
    GroupName: Admins
    Description: Admin user group
    Precedence: 0
    UserPoolId: !Ref UserPool
I created an Admins group to manage access control for specific endpoints. For instance, certain API endpoints should only be accessible by users in this group. Here’s how you can handle that:
- Check
cognito:groupsin Access Tokens: When a user makes an API call, you can inspect thecognito:groupsfield in their access token to check which group they belong to. For example, you might see something like this in the access token:
"sub": "b235c4e4-5041-7032-c107-a974bf216ff6",
"cognito:groups": [
  "Admins"
],
"email_verified": true
This lets you validate group membership at the API level (via middleware, for example) and restrict access accordingly.
Customizing Access Tokens with Lambda: But why add unnecessary complexity when Cognito can handle this for you? 😎 As of December 2023, Cognito finally allows us to customize access tokens using Lambda triggers—a long-awaited feature! This makes life easier by letting us modify access tokens directly. You can read more about this awesome update here.
Pro tip: I’ve seen some examples where people misuse ID tokens instead of access tokens, probably because in the past, Cognito only let you modify ID tokens. But remember, ID tokens and access tokens have different purposes. For a deeper dive into this topic, check out this great Auth0 blog post provides a great explanation of the differences.
Of course, I took the easy route and used the new feature. 😉
Costumize the Access token
Here’s how I set up my Lambda trigger to add custom claims to the access token:
TriggerFunction:
	Type: AWS::Serverless::Function
	Metadata:
		BuildMethod: makefile
		BuildTarget: build-TriggerFunction
	Condition: ScopeGroups
	Properties:
		CodeUri: .
		Handler: bootstrap
		Runtime: provided.al2
		Architectures:
		- x86_64
		Timeout: 5
		Events:
			CognitoTrigger:
				Type: Cognito
			Properties:
				Trigger: PreTokenGeneration
				UserPool: !Ref UserPool
This Lambda function, located in lambda/addGroupScopeToAccessToken, is pretty simple. It retrieves the user’s group and adds it to the scope field in the access token. I also throw in the client ID of my user pool for good measure, in case you need to handle multiple clients.
Here’s a heads-up: Cognito supports different versions of the pre-token generation trigger. By default, version V1_0 only allows modifications to the id_token. If you want to customize the access token too, you’ll need to enable additional functionality—this is the shiny new feature we talked about earlier!
To get this all working, you’ll need to do some manual steps after deployment, as I haven’t found a way to fully automate this through SAM just yet. But don’t worry, it’s easy, and I’ll walk you through it after deployment!
For detailed instructions, you can check out the official AWS Cognito Pre-Token Generation documentation.
Build and Deploy Cognito
Build
To get started, you’ll need Docker running on your local machine. We’ll use Docker as an emulator to create an environment that mimics AWS Lambda’s runtime. This ensures that our binary is compatible with Amazon Linux 2 (AL2), which Lambda uses, even if you’re working on a different architecture or operating system locally.
In the /congito folder, run the following command:
sam build -u`
You’ll see output similar to this:
sam build -u
Starting Build inside a container
Building codeuri: /home/joaofolgado/dev/projects/Home/HomeAppApi/cognito runtime: provided.al2 metadata: {'BuildMethod': 'makefile',
'BuildTarget': 'build-TriggerFunction'} architecture: x86_64 functions: TriggerFunction

Fetching public.ecr.aws/sam/build-provided.al2:latest-x86_64 Docker container image......
Mounting /home/joaofolgado/dev/projects/Home/HomeAppApi/cognito as /tmp/samcli/source:ro,delegated, inside runtime container

Build Succeeded

Built Artifacts  : .aws-sam/build
Built Template   : .aws-sam/build/template.yaml

Commands you can use next
=========================
[*] Validate SAM template: sam validate
[*] Invoke Function: sam local invoke
[*] Test Function in the Cloud: sam sync --stack-name {{stack-name}} --watch
[*] Deploy: sam deploy --guided
TriggerFunction: Running CustomMakeBuilder:CopySource
TriggerFunction: Running CustomMakeBuilder:MakeBuild
TriggerFunction: Current Artifacts Directory : /tmp/samcli/artifacts
GOOS=linux CGO_ENABLE=0 go build -o lambda/addGroupScopeToIdToken/bootstrap lambda/addGroupScopeToIdToken/main.go
cp lambda/addGroupScopeToIdToken/bootstrap /tmp/samcli/artifacts/.
As you can see, the sam build -u command pulls the public.ecr.aws/sam/build-provided.al2:latest-x86_64 image, which is used to build our Lambda function in a containerized environment. The command also runs the makefile to compile our Go binary for the Lambda runtime.
Once the build completes, you’ll find the compiled binaries inside the .aws-sam directory. Everything’s packaged and ready to go!
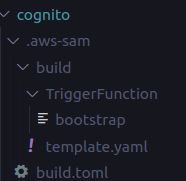
.aws-sam folder
Deploy
Finally, the fun part—let’s deploy our serverless authentication server!
Head to the /congito folder and run the following command:
sam deploy -g
You should see something like this:
Configuring SAM deploy
======================

        Looking for config file [samconfig.toml] :  Found
        Reading default arguments  :  Success

        Setting default arguments for 'sam deploy'
        =========================================
        Stack Name: cognitoauthstack
        AWS Region: eu-west-1
        Parameter AppName: homeapp
        Parameter ClientDomains: https://example.com
        Parameter AddGroupsToScopes: true
        #Shows you resources changes to be deployed and require a 'Y' to initiate deploy
        Confirm changes before deploy [Y/n]:
        #SAM needs permission to be able to create roles to connect to the resources in your template
        Allow SAM CLI IAM role creation [Y/n]:
        #Preserves the state of previously provisioned resources when an operation fails
        Disable rollback [y/N]:
        Save arguments to configuration file [Y/n]:
        SAM configuration file [samconfig.toml]:
        SAM configuration environment [default]:

        Looking for resources needed for deployment:
Because of how the template is set up, you’ll be asked to provide a few inputs:
- Stack Name: Choose a name for your stack.
- Region: The AWS region where you want to deploy your Cognito.
- App Name: The name of your app.
- Client Domains: You can use a placeholder or your own Callback URLs.
- Add Groups to Scopes: Set this to true so the access token scopes reflect the user’s group.
Once the deployment finishes, you’ll see some output that looks like this:
-----------------------------------------------------------------------------------------------------------------------------------------------------------------------
Outputs
-----------------------------------------------------------------------------------------------------------------------------------------------------------------------
Key                 UserPoolClientId
Description         Application client ID
Value               72*************

Key                 UserPoolId
Description         User pool ID
Value               eu-west-1_******

Key                 AuthUrl
Description         Url used for authentication
Value               https://homeapp-*******.auth.eu-west-1.amazoncognito.com
-----------------------------------------------------------------------------------------
Make sure to save these values—you’ll need them later, and having them handy will make life easier down the road.
And just like that, your serverless authentication server is deployed! Seems too easy, right? Well, guess what? It’s real! Go to your AWS console, and you should see a Cognito user pool with a Cognito client created, plus a Lambda function ready to go.
Setup Advance security
As I mentioned earlier, there’s no way to set up advanced security directly in the SAM template (at least, not that I’ve found), but setting it up manually is straightforward! Here’s how to do it:
- Go to the AWS console and navigate to your Cognito User Pool:

-
Select Activate advanced security features:
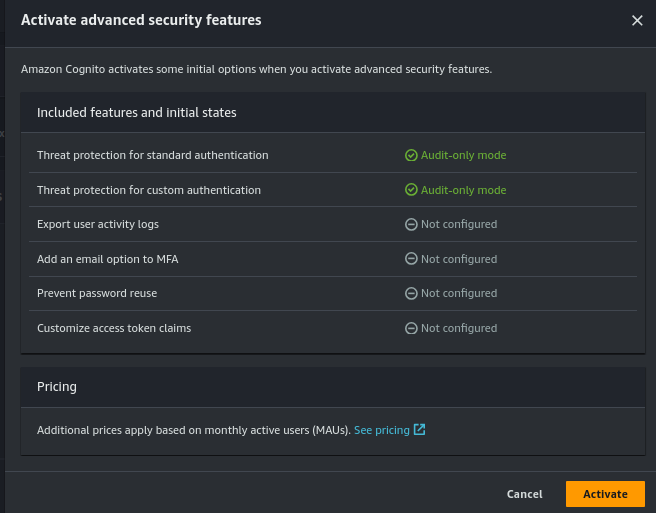
You’ll see a modal pop up. There’s a warning about pricing at the bottom, so make sure you review this and decide whether the additional cost makes sense for your use case. To mitigate costs, you could apply this feature only to sensitive accounts for example.
Enable Pre-Token Generation Trigger
We also need to enable the Pre-Token Generation trigger, which allows us to modify the access token (instead of just the ID token):
- In your Cognito user pool, navigate to Triggers and select Pre-token generation.

- Choose
Basic feature + access tokencustomization and select the Lambda function that was created during our SAM deploy:
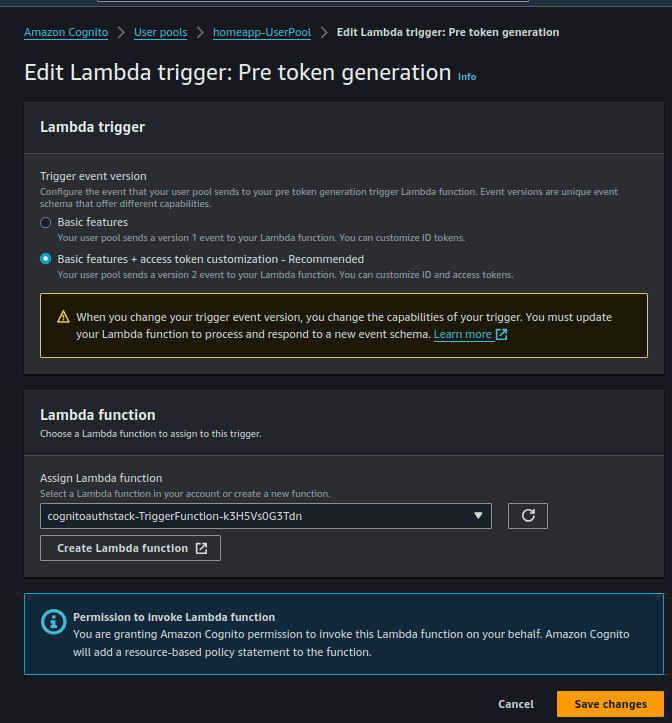
Once you’ve made those selections, save your changes, and everything should be good to go!
Test cognito with postman
Now that we’ve set up everything, it’s time to test our Cognito authentication using Postman.
Setup
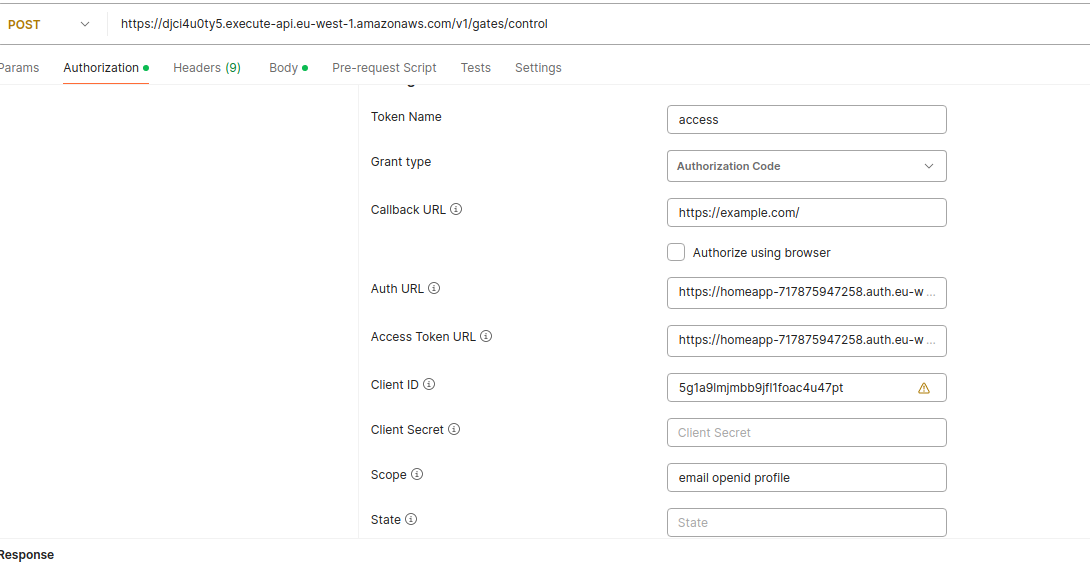
In Postman, follow these steps:
- Go to the Authorization tab.
- Set Type to OAuth 2.0.
- Set Token Name to access.
- Set Grant Type to Authorization Code.
- Set Callback URL to the ClientDomain you specified during deployment (this is the redirect URL).
- Set Auth URL to:
https://{UserPoolDomain}.auth.eu-west-1.amazoncognito.com/oauth2/authorize - Set Access Token URL to:
https://{UserPoolDomain}.auth.eu-west-1.amazoncognito.com/oauth2/token - Set Client ID to your Cognito Client ID. You can find this in your AWS Console:
- Go to User Pool > App Integration, and you’ll see your App Client list.
- Use the Client ID from the app created during the SAM deploy.
Test
Now, let’s test this setup with two users—one that belongs to the Admins group and another that doesn’t.

Users List

Admin Group
Login with Admin user
Click on Get new Access Token on Postman. You should see a login page that looks like this:

Once you log in, you’ll receive both the access token and the ID token. Here’s an example of the access token:
{
  "sub": "b235c4e4-5041-7032-c107-a974bf216ff6",
  "cognito:groups": [
    "Admins"
  ],
  "iss": "https://cognito-idp.eu-west-1.amazonaws.com/eu-west-1_E2sbxRVot",
  "version": 2,
  "client_id": "72pe87ha1sm73vraqa6scq89pk",
  "origin_jti": "c1932ccb-d8e4-471e-9cd6-463b14d0cb17",
  "event_id": "7e25b6f4-4070-461f-9fbe-7a2ce1c2ec16",
  "token_use": "access",
  "scope": "openid profile Admins-72pe87ha1sm73vraqa6scq89pk email",
  "auth_time": 1727124897,
  "exp": 1727128497,
  "iat": 1727124897,
  "jti": "cfa6f9e2-f292-4b15-afc0-8ddc85a77f38",
  "username": "b235c4e4-5041-7032-c107-a974bf216ff6"
}
Notice two important fields:
- cognito:groups: This confirms that the user belongs to the
Adminsgroup. - scope: You’ll see that
Admins-72pe87ha1sm73vraqa6scq89pkwas added to the scope field by our Lambda function, which was triggered before the tokens were generated.
Login with a not admin user
When a user not in the Admins group logs in, the access token looks like this:
{
  "sub": "1205d484-20a1-7053-a8a8-187a43899158",
  "iss": "https://cognito-idp.eu-west-1.amazonaws.com/eu-west-1_E2sbxRVot",
  "version": 2,
  "client_id": "72pe87ha1sm73vraqa6scq89pk",
  "origin_jti": "b893726c-e0f5-41f7-954a-c852eb49f683",
  "event_id": "091cf9ac-9b17-41b0-9882-da43197a894b",
  "token_use": "access",
  "scope": "openid profile email",
  "auth_time": 1727124837,
  "exp": 1727128437,
  "iat": 1727124837,
  "jti": "63bab15f-a06d-4e4c-b0fa-ca776596390b",
  "username": "1205d484-20a1-7053-a8a8-187a43899158"
}
Here, you’ll notice that:
- There’s no
cognito:groupsfield because the user is not part of theAdminsgroup. - The scope field does not include the
Group-clientIdinformation.
This distinction between tokens will be crucial in the next section, where we’ll create two endpoints: one that can be accessed by all users and another restricted to those in the Admin group.
Mfa drama
“Wait… we need MFA for authentication?!” 😱
Cue the panic: 3 months, 10 sprints dedicated to building a security feature! The PMs are pulling their hair out—“Who cares about security? That doesn’t bring in $$$! Where are the features that actually matter??”
Meanwhile, the devs are like, “Relax, it’s just your data. What could possibly go wrong?” 😏
But then, a hero developer steps in to save the day. “Hold up, we’re using Cognito! I can have MFA working in like, 2 minutes!”
And just like that, they show the magic:
Steps to Enable MFA:
- Go to your user pool:

Cognito User Pool
- Click Edit under the MFA and verifications section:
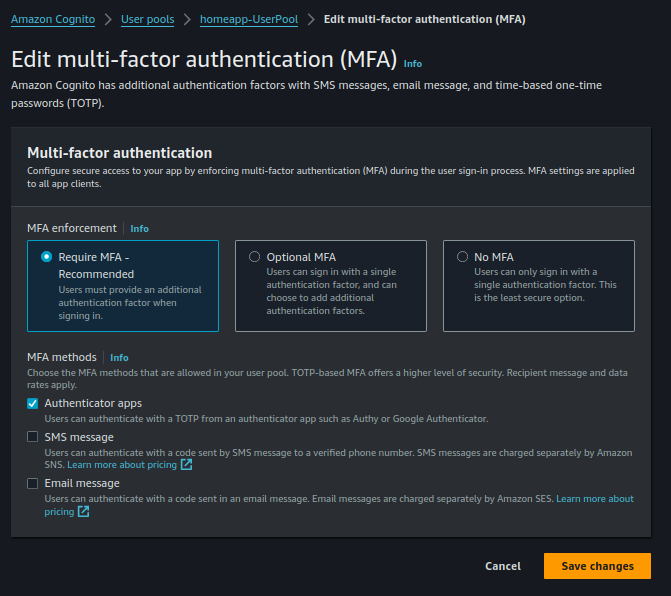
Activate MFA
- Toggle MFA on, hit Save, and you’re done!
No, seriously—it’s that simple.
Now, when you try logging in via Postman, you’ll be greeted with something like this:
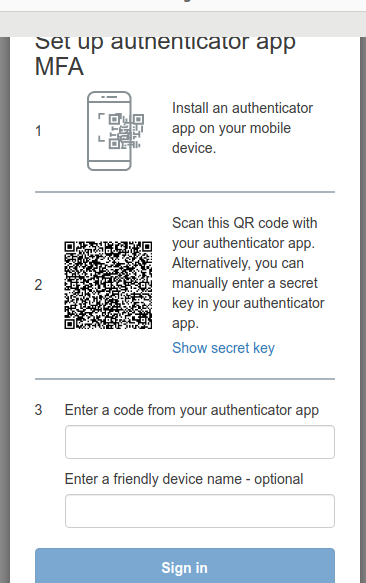
MFA QR Code
Scan the QR code, enter the codes, and voilà—you’ll receive the access token.
That’s it! Done in no time. 🏆
Of course, when it comes to implementing this on your mobile app or website, you’ve got three options:
- Integrate Cognito with your client from scratch (bring on the coding sessions),
- Use Cognito’s built-in UI (handy but limited), or
- Leverage AWS Amplify for a bit more customization (but hey, it’s not perfect).
I hope this section gave you a laugh! Everything will make even more sense in the next section… promise. 😉
Setup Serverless Api
In this section, we’ll walk through how to create a serverless API with the following features:
- Access token validation: Users need to authenticate through the Cognito setup we built earlier.
- Publish to AWS IoT via MQTT: Your API will be able to send messages to IoT topics.
- Fetch images from an S3 bucket: Retrieve files stored in S3 with ease.
I won’t go into every technical detail, because I want to keep the pace quick, but I’ll focus on the most important parts:
- How to validate access tokens and scopes.
- How to configure the SAM template to allow Lambda functions to publish to IoT MQTT topics.
- How to allow Lambda functions to retrieve images from S3 buckets.
The full repository is available, and the rest of the setup should be straightforward!
Use cognito for authorization of the Api Calls
Auth:
	Authorizers:
		CognitoAuthorizer:
			Type: CognitoAuthorizer
			AuthorizationScopes:
				- email
				- openid
				- profile
			UserPoolArn: !Sub arn:aws:cognito-idp:${Region}:${AccountId}:userpool/${Region}${UserPool}
	DefaultAuthorizer: CognitoAuthorizer
In this configuration, we’re telling the API to use the Cognito User Pool specified by UserPoolArn (which is the one we created earlier). The access token must include the email, openid, and profile scopes.
Now, let’s define the authorization for one of the API’s endpoints:
Events:
	ControlGate:
		Type: Api
		Properties:
			Method: Post
			Path: /gates/control
			RestApiId: !Ref Api
			Auth:
				Authorizer: CognitoAuthorizer
				AuthorizationScopes:
				- !Sub Admins-${Audience}
This configuration belongs to the MqttPublisherFunction Lambda function. Notice the Admins-${Audience} scope used for this endpoint? This allows only users with that specific scope to access the /gates/control API. Starting to see how things fit together? 😏
Policies for lambda function
- Allow lambda function to publish to an iot topic:
Policies:
	- Statement:
		- Effect: Allow
			Action:
				- iot:Publish
			Resource: !Sub arn:aws:iot:${Region}:${AccountId}:topic/controlGate
This policy grants our Lambda function permission to publish to the controlGate IoT topic
- Allow to read from a S3 Bucket:
Policies:
	- Statement:
		- Effect: Allow
			Action:
				- s3:GetObject
			Resource: arn:aws:s3:::jfolgado-homeapp-userprofile-v1/*
This policy allows the Lambda function to retrieve objects from the jfolgado-homeapp-userprofile-v1 S3 bucket. I created this bucket manually, but you can easily automate that with SAM as well—there are tons of guides out there to help with this!
Verifying Permissions After Deployment
Once you’ve deployed everything, head to the AWS Console and check out your Lambda function’s permissions. For example, here’s how the Lambda function looks with the policy that allows it to publish to the IoT MQTT topic:
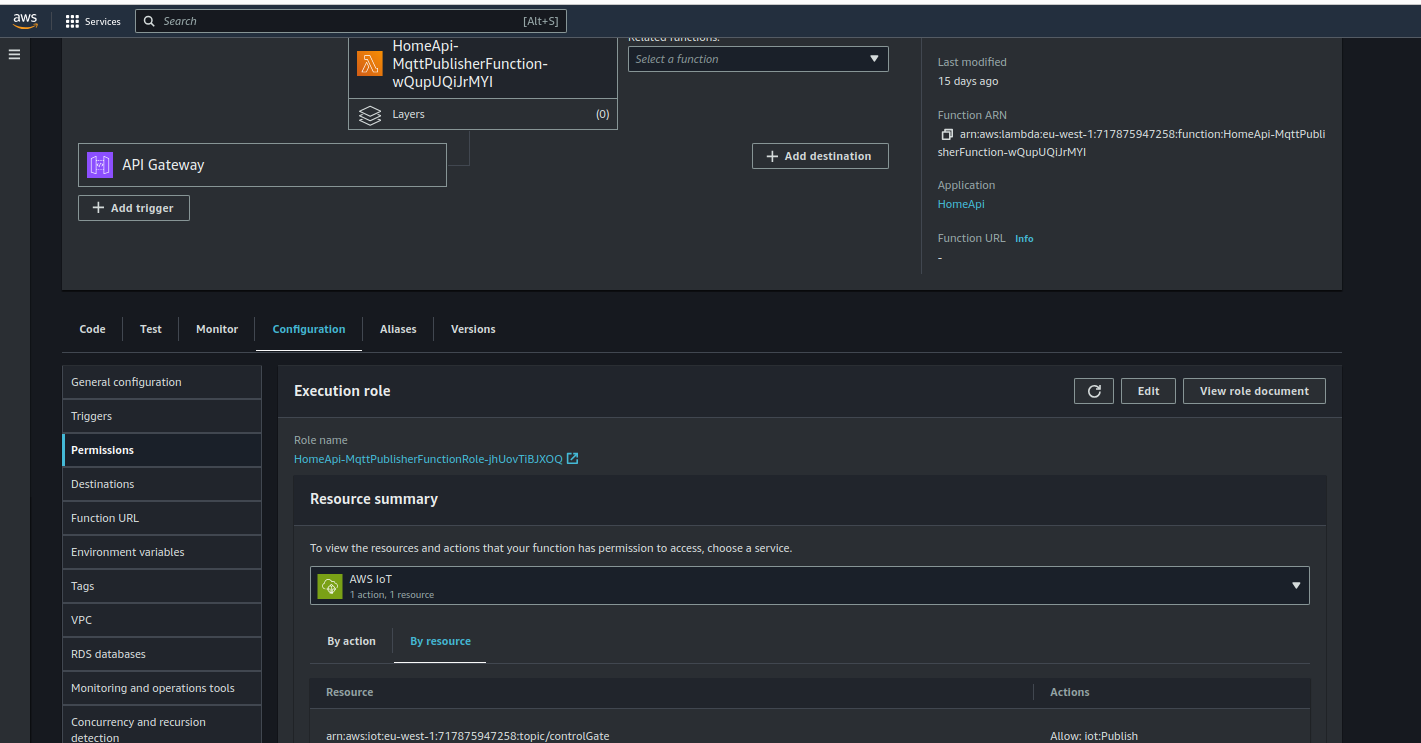
IoT Publish Policy
You can see that the function has permission to publish to arn:aws:iot:eu-west-1:717875947258:topic/controlGate.
Build and deploy
Build
Just like in the Cognito section, navigate to the /api folder and run sam build -u to build the project.
rm -rf .aws-sam/
joaofolgado@joaofolgado:~/dev/projects/Home/HomeAppApi/api$ sam build -u
Starting Build inside a container
Building codeuri: /home/joaofolgado/dev/projects/Home/HomeAppApi/api runtime: provided.al2 metadata: {'BuildMethod': 'makefile', 'BuildTarget':
'build-MqttPublisherFunction'} architecture: x86_64 functions: MqttPublisherFunction

Fetching public.ecr.aws/sam/build-provided.al2:latest-x86_64 Docker container image......
Mounting /home/joaofolgado/dev/projects/Home/HomeAppApi/api as /tmp/samcli/source:ro,delegated, inside runtime container
MqttPublisherFunction: Running CustomMakeBuilder:CopySource
MqttPublisherFunction: Running CustomMakeBuilder:MakeBuild
MqttPublisherFunction: Current Artifacts Directory : /tmp/samcli/artifacts
GOOS=linux CGO_ENABLE=0 go build -o lambda/mqttPublisher/bootstrap lambda/mqttPublisher/main.go
cp lambda/mqttPublisher/bootstrap /tmp/samcli/artifacts/.
Building codeuri: /home/joaofolgado/dev/projects/Home/HomeAppApi/api runtime: provided.al2 metadata: {'BuildMethod': 'makefile', 'BuildTarget':
'build-GetUserProfileImage'} architecture: x86_64 functions: GetUserProfileImage

Fetching public.ecr.aws/sam/build-provided.al2:latest-x86_64 Docker container image......
Mounting /home/joaofolgado/dev/projects/Home/HomeAppApi/api as /tmp/samcli/source:ro,delegated, inside runtime container

Build Succeeded

Built Artifacts  : .aws-sam/build
Built Template   : .aws-sam/build/template.yaml

Commands you can use next
=========================
[*] Validate SAM template: sam validate
[*] Invoke Function: sam local invoke
[*] Test Function in the Cloud: sam sync --stack-name {{stack-name}} --watch
[*] Deploy: sam deploy --guided
GetUserProfileImage: Running CustomMakeBuilder:CopySource
GetUserProfileImage: Running CustomMakeBuilder:MakeBuild
GetUserProfileImage: Current Artifacts Directory : /tmp/samcli/artifacts
GOOS=linux CGO_ENABLE=0 go build -o lambda/getUserImageProfile/bootstrap lambda/getUserImageProfile/main.go
cp lambda/getUserImageProfile/bootstrap /tmp/samcli/artifacts/.
Deploy
Remember the values that I told you to be close to you ? We will use it now!
Run sam deploy -g
Configuring SAM deploy
======================

        Looking for config file [samconfig.toml] :  Found
        Reading default arguments  :  Success

        Setting default arguments for 'sam deploy'
        =========================================
        Stack Name: HomeApi
        AWS Region: eu-west-1
        Parameter UserPool: _E2sbxRVot
        Parameter AccountId: 717875947258
        Parameter Region: eu-west-1
        Parameter Audience: 72pe87ha1sm73vraqa6scq89pk
        #Shows you resources changes to be deployed and require a 'Y' to initiate deploy
        Confirm changes before deploy [Y/n]:
        #SAM needs permission to be able to create roles to connect to the resources in your template
        Allow SAM CLI IAM role creation [Y/n]:
        #Preserves the state of previously provisioned resources when an operation fails
        Disable rollback [y/N]:
        Save arguments to configuration file [Y/n]:
        SAM configuration file [samconfig.toml]:
        SAM configuration environment [default]:
You can find all these parameters on the AWS Console, but if you saved the values from the earlier Cognito deployment, you should use them here:
Parameter UserPool: eu-west-1_****** (replace ****** with the actual value from your previous Cognito setup, but don’t include the eu-west-1 prefix again).
Parameter AccountId: (your AWS account ID).
Region: The AWS region where you want to deploy the API.
Parameter Audience: Your Cognito client ID.
Post-Deployment
After deployment, head to the API Gateway service in your AWS Console. You should see a newly created API that looks like this:
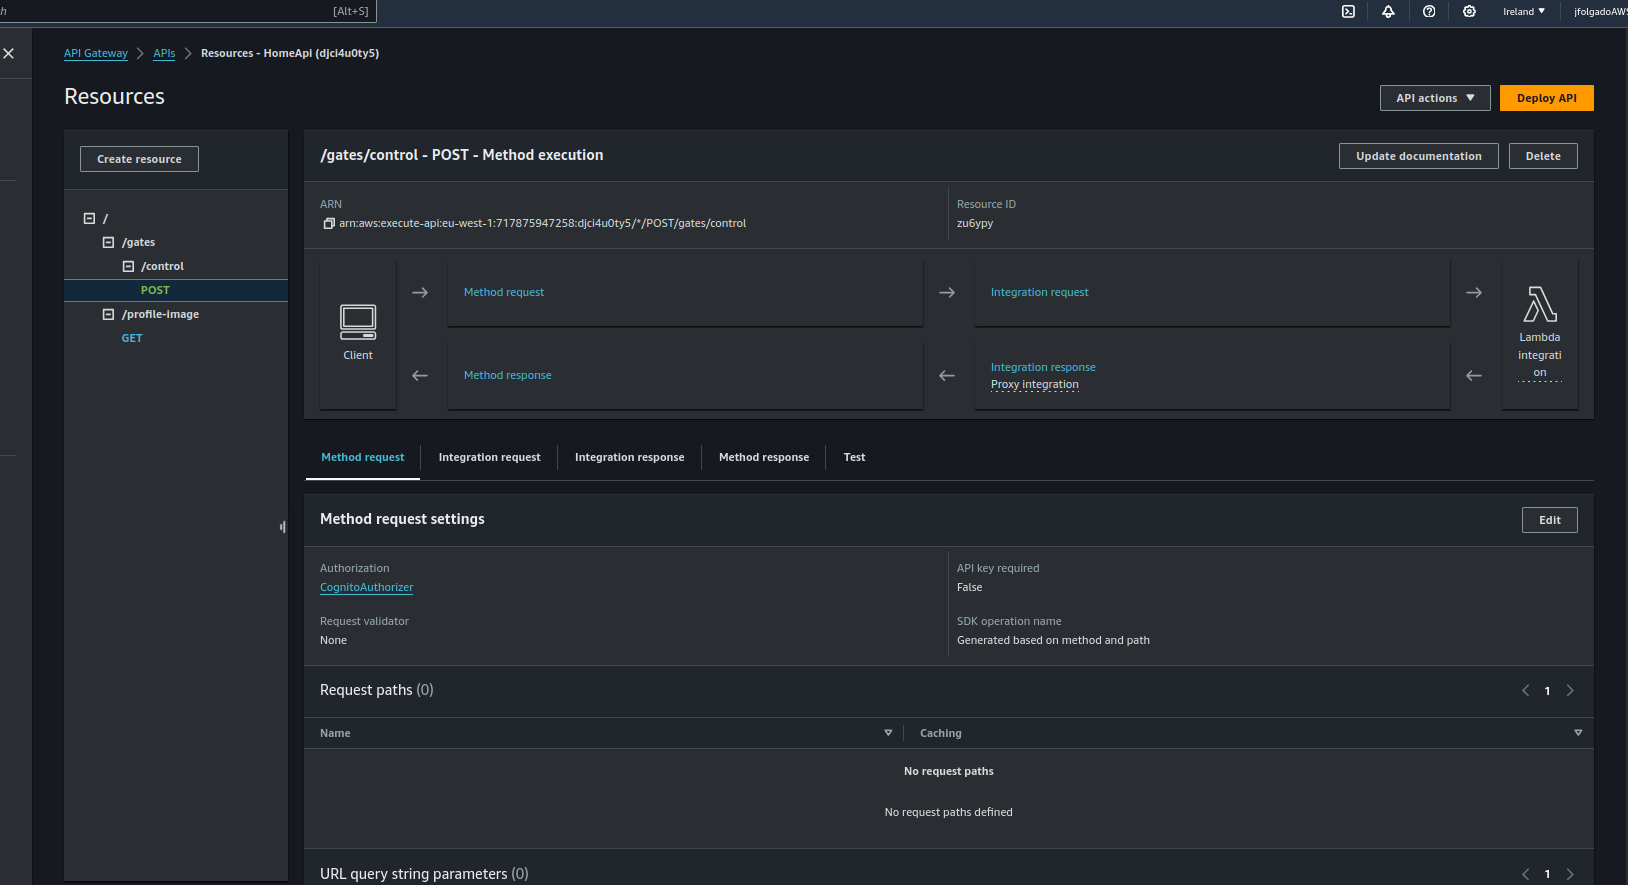
API Gateway
Test Api
In this section, I will demonstrate how our API interacts with Cognito through two examples.
Get profile image
The first test is for the Get Profile Image endpoint. This endpoint allows any authenticated user to make a request, as we haven’t set any restrictions on it. If you recall, the API allows access with the three main scopes: openId, email, and profile.
A quick explanation: in the Lambda function, I’m using the sub field from the access token to retrieve the image. The sub field is a unique identifier for each user in the Cognito pool. There are many ways to do this, but I chose this approach to demonstrate how the access token can be utilized within Lambda functions.
Here is an example of calling the endpoint:
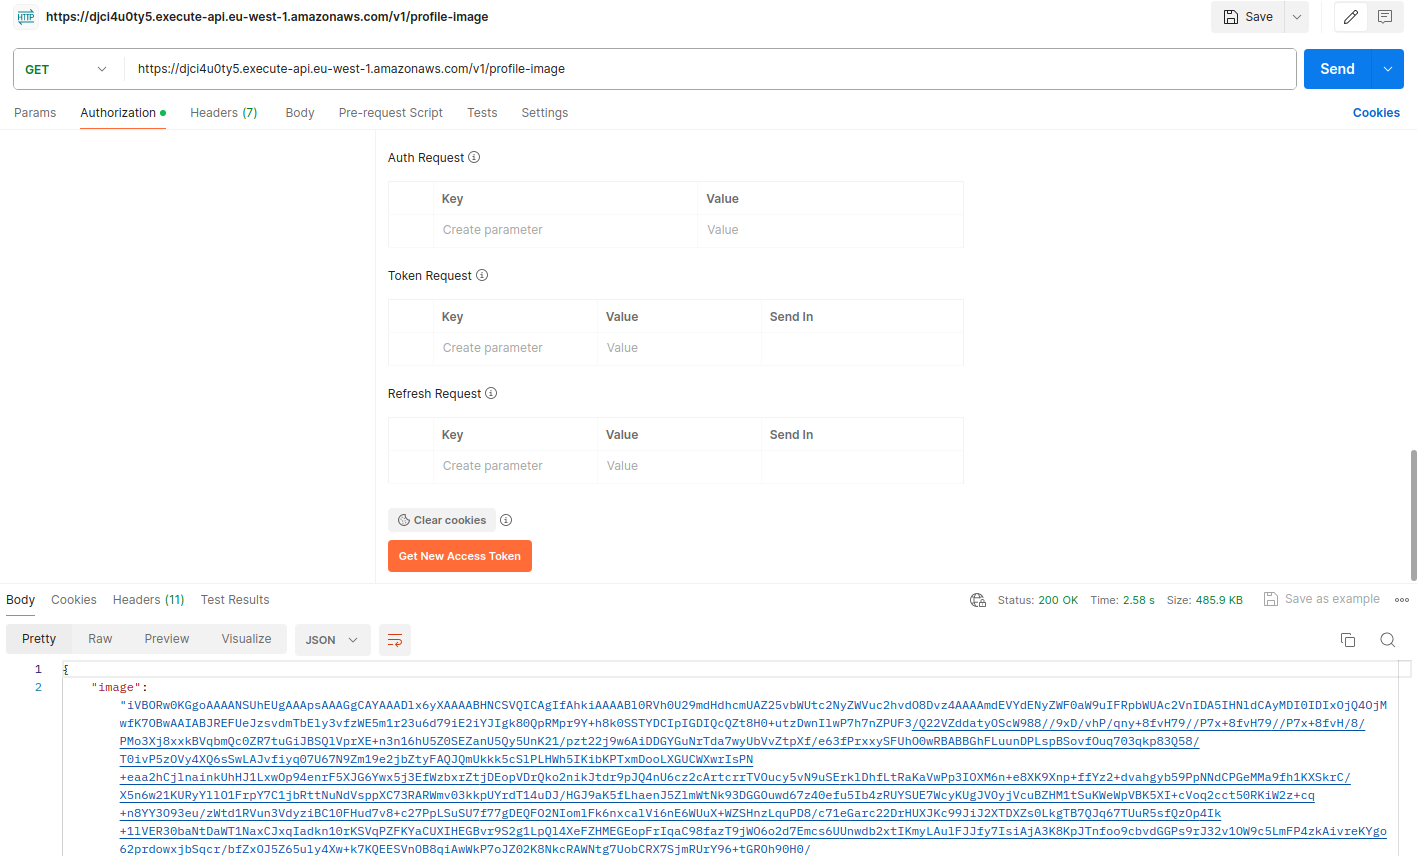
Postman API call with profile image response
As shown above, I received the image encoded in base64 format. This is just for demonstration purposes—there are many ways to return an image.
When I decode this base64 string, I get the following image:
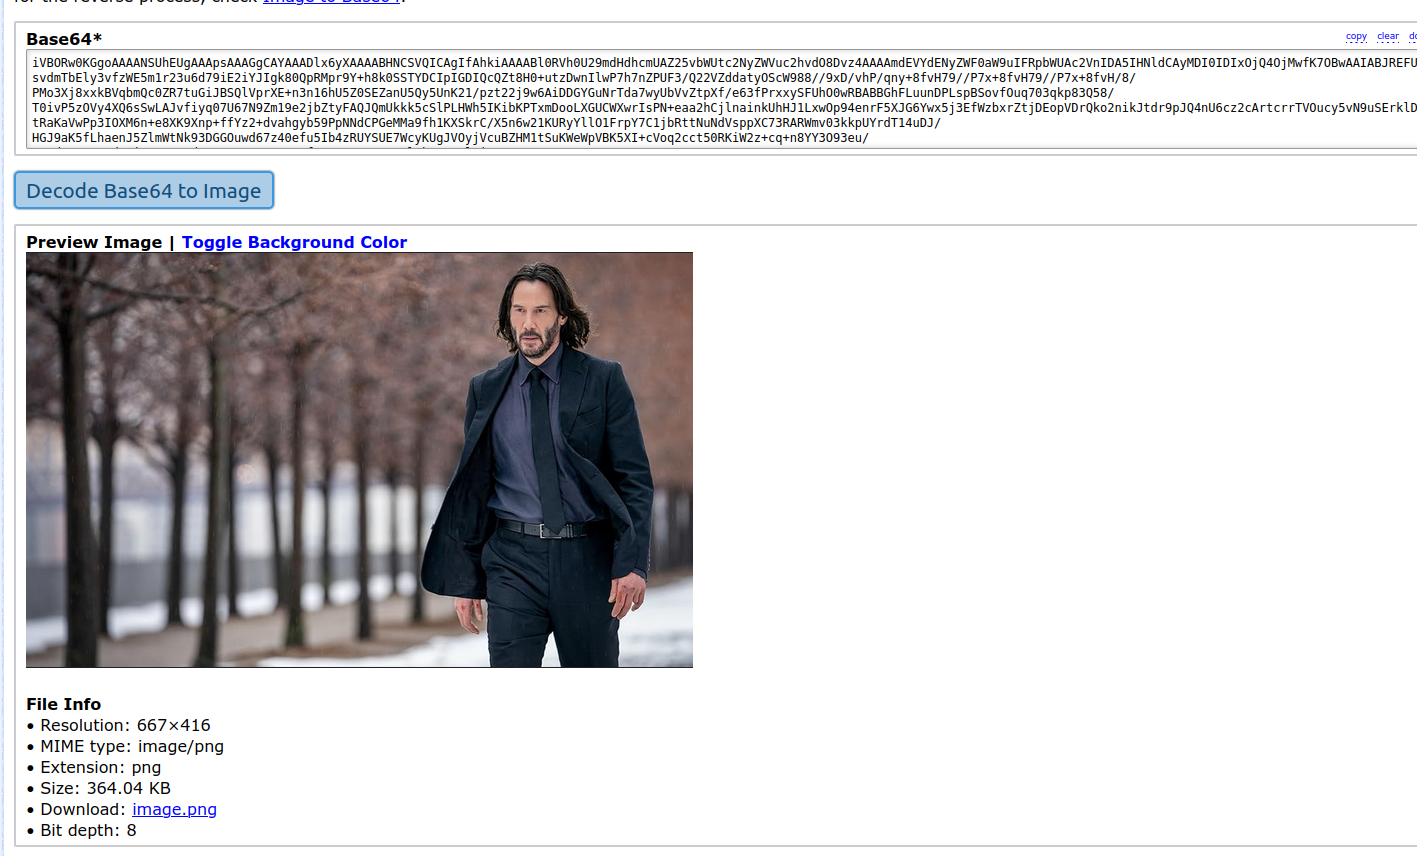
Decoded image of a non-admin user
This is for a user who is not in the admin group. However, if I log in with a user who is an admin, I receive a different image:
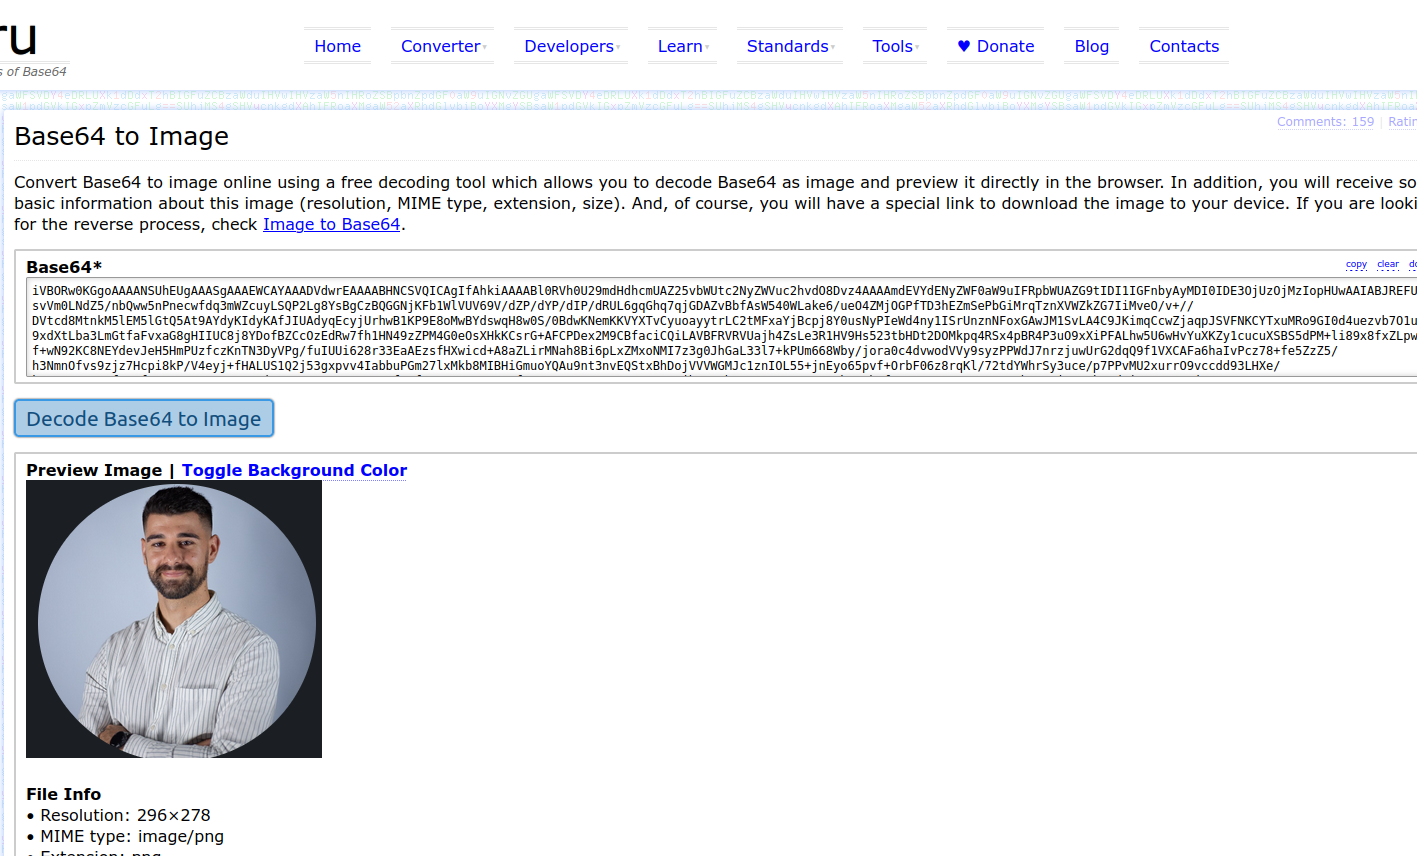
Admin user image
Yep, I have more privileges than John F**** Wick! 😏
Publish a message on aws iot core
The second test involves publishing a message to AWS IoT Core. First, I’ll attempt to make the request with a user who is not in the admin group. As expected, it returns an unauthorized error:
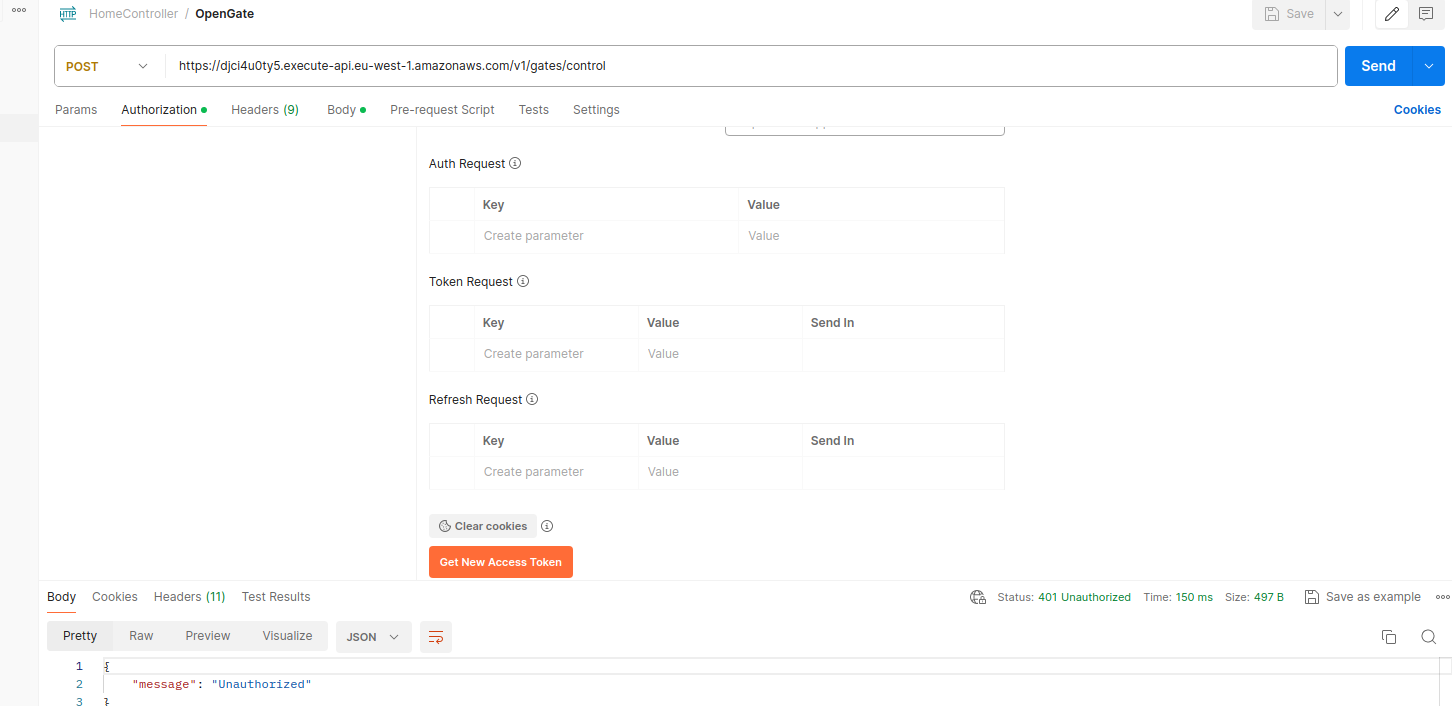
Unauthorized response from non-admin user
Now, let’s log in with a user who is in the admin group. Before making the request, I’ll open the AWS IoT Core test console so we can observe the message being published.
As you can see, there are no messages currently:
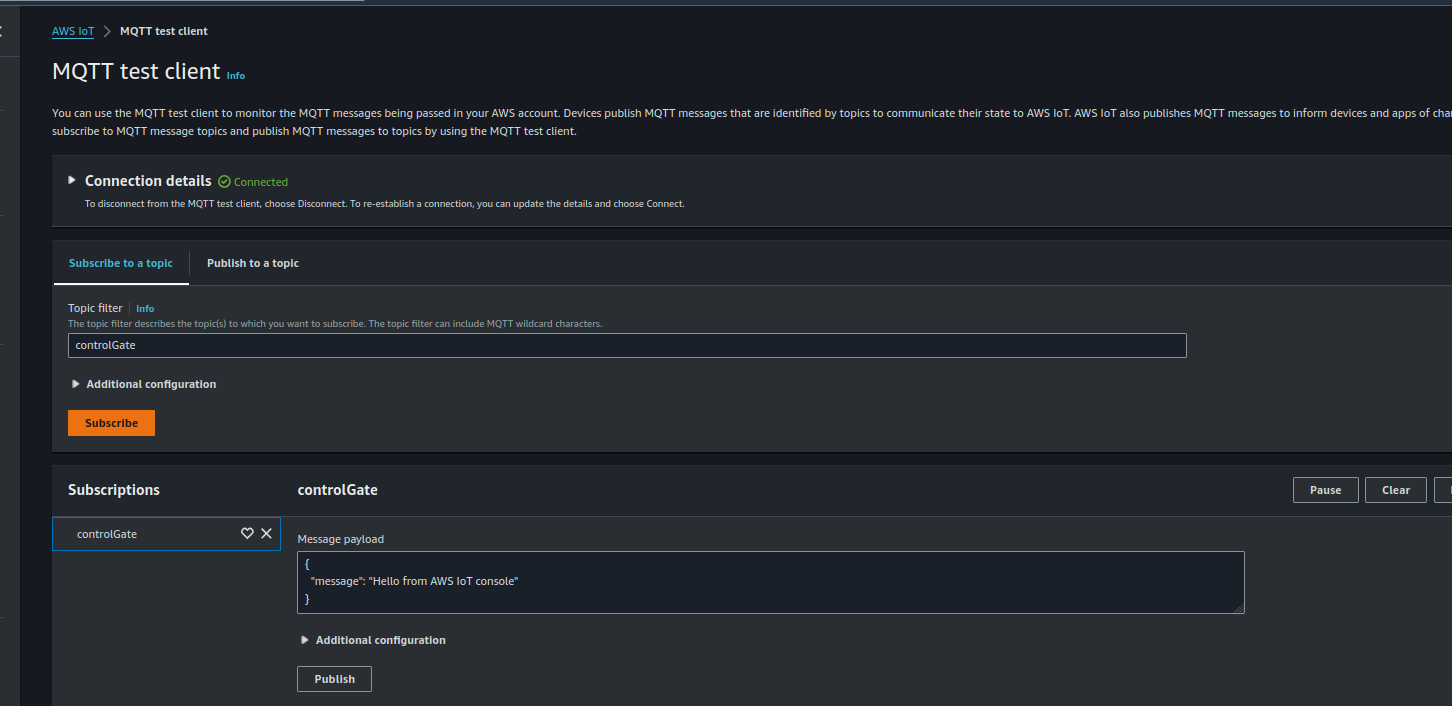
AWS IoT MQTT console with no messages
Now, after making the request with the admin user:
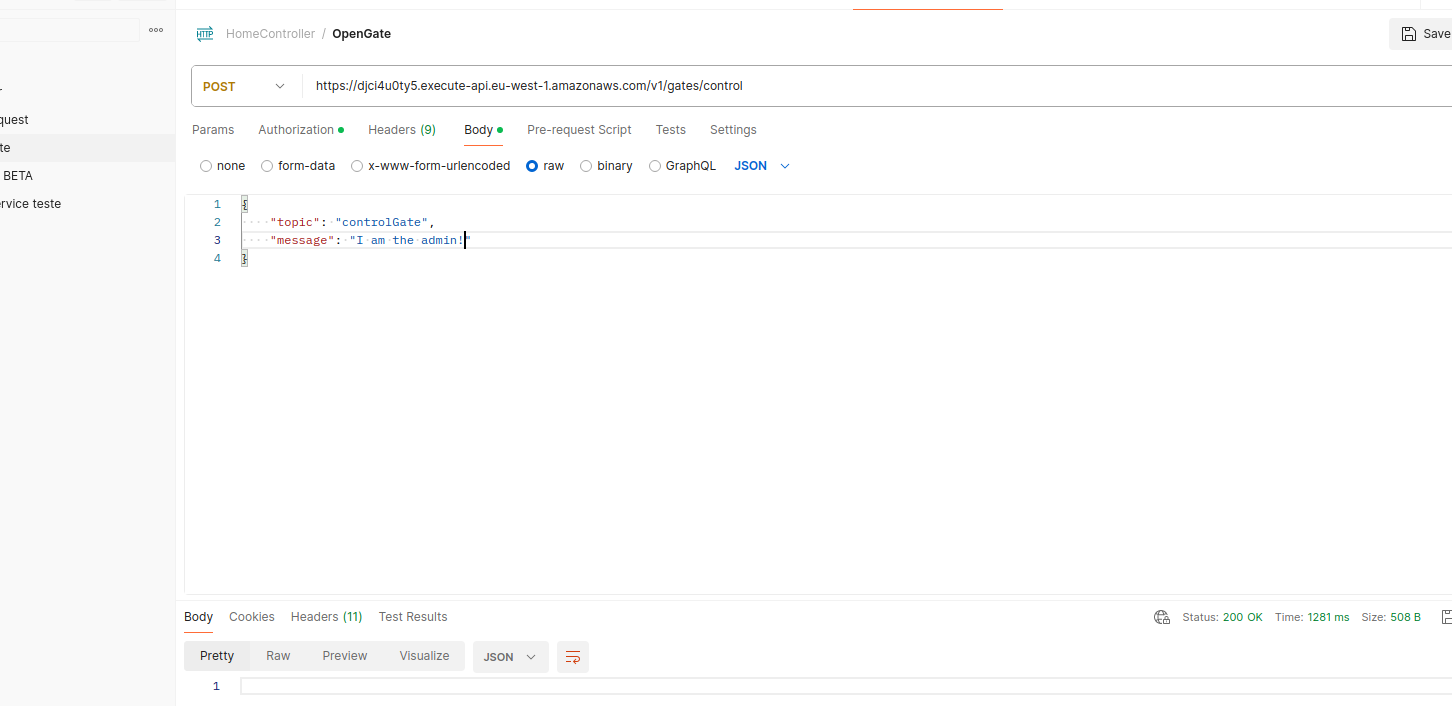
Admin publishing request
The response is a 200 OK, and if we check the IoT Core console again, a message has indeed been published:
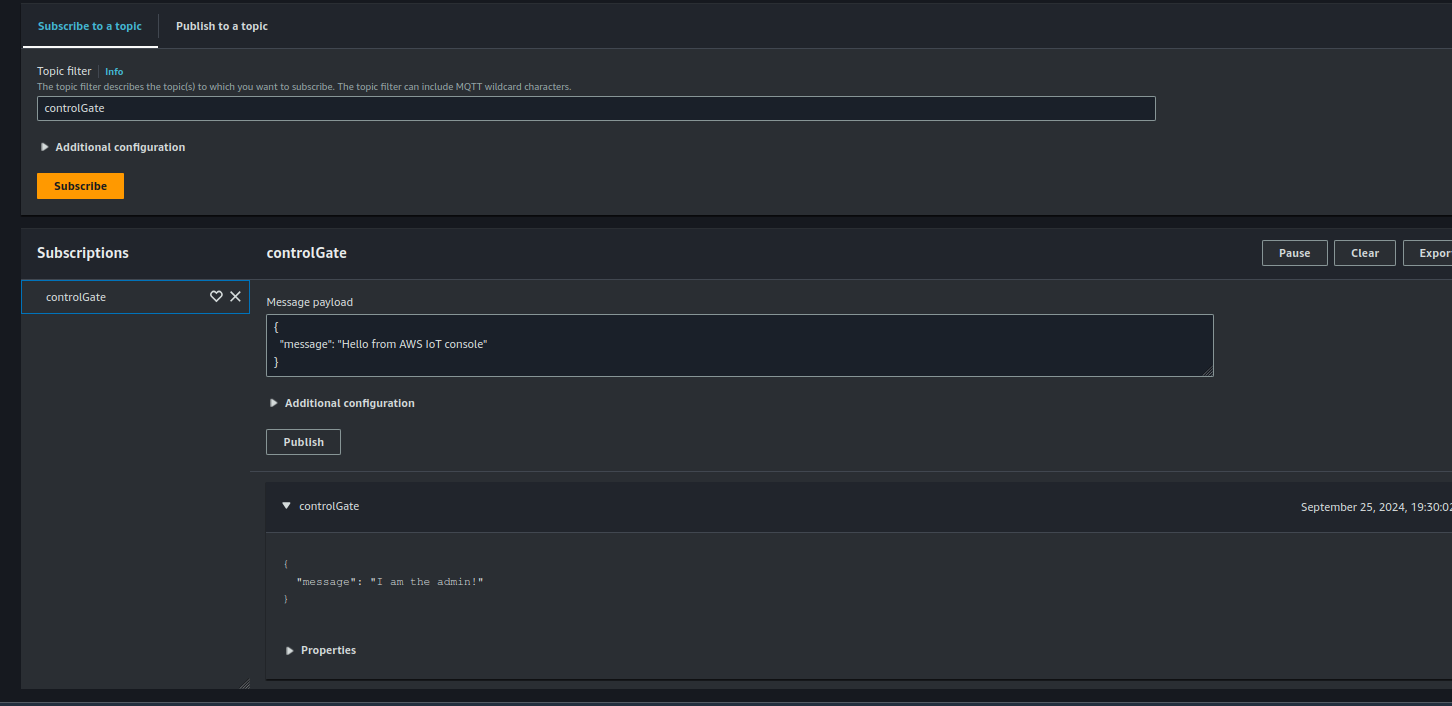
Message published to AWS IoT MQTT
This example demonstrates how all the components work together and how easily we can control access to API endpoints based on scopes! 😊
I hope you enjoyed this section! But wait, there’s more! Want to see how all of this works on a mobile app? It’s actually quite easy using AWS Amplify!
I’ll show you how in the next extra section! 🎁
Integrate Cognito in Your Mobile App with Amplify
Alright, let’s talk about integrating Cognito into your mobile app using AWS Amplify. Now, I promise this won’t be a dry, technical marathon—I’ll keep it light, with just the essentials to get you up and running fast. Plus, you’ll have all the code ready to go!
Meet AWS Amplify: The Developer’s Swiss Army Knife
If you haven’t used AWS Amplify yet, get ready. It’s like a one-stop shop for app developers, making it super easy to connect your mobile or web app to AWS services like Cognito, S3, DynamoDB, and more. It’s especially handy when it comes to integrating authentication.
The best part? Amplify comes with pre-built authentication pages ready to use! With minimal setup, you can handle sign-ups, logins, multi-factor authentication (MFA), and more. It’s like having a personal password manager built right into your app.
But… (and you knew there was a “but” coming) 🛑 Amplify has a few quirks.
The big Amplify Quirk
If you’re using the Amplify UI out of the box, you’re locked into the aws.cognito.signin.user.admin scope. This is highlighted in a GitHub issue that’s been bothering developers. Basically, it limits users to changing their attributes in Cognito. Need more custom scopes? Well, they just vanish.
And that’s not all. There are also some security concerns, as mentioned in this blog post. It’s something to keep an eye on!
How to work around it ?
Luckily, we’ve got some options! Here are three strategies you can use to integrate Cognito into your app with Amplify, even with those limitations:
-
Use the Hosted UI: AWS’s hosted UI provides a quick way to set up authentication with all the features of Cognito. The downside? It’s not very customizable—good enough for basic needs but might not be flexible for more advanced workflows.
-
Manual Integration: You can manually set up the integration between your mobile app and Cognito. This gives you full control over tokens and scopes, but it takes some effort. Think of it like building your own custom suit—tailored, but a bit time-consuming.
-
Modify Access Tokens in Pre-Build: This is a more advanced approach but very effective, especially if you have a small user base. Essentially, you modify the access tokens in the pre-build phase using a Lambda function. This way, you bypass Amplify’s UI limitations and gain more flexibility with your scopes.
Why I’m Going with Option 3
For my app, only a few people (three or four) will use it, so option 3 is the way to go. It’s simple and doesn’t break the bank. In this approach, I tweak the access tokens in the pre-build phase to include the custom scopes I need.
Here’s a sneak peek at the Lambda function that triggers in the pre-build phase to customize those tokens:
func handler(ctx context.Context, event Event) (Event, error) {
	newScopes := []string{"openid", "profile", "email"}
	claimstoSuppress := []string{"aws.cognito.signin.user.admin"}
	for _, group := range event.Request.GroupConfiguration.GroupsToOverride {
		newScope := fmt.Sprintf("%s-%s", group, event.CallerContext.ClientId)
		newScopes = append(newScopes, newScope)
	}

	event.Response = map[string]interface{}{
		"claimsAndScopeOverrideDetails": map[string]interface{}{
			"accessTokenGeneration": map[string]interface{}{
				"scopesToAdd":      newScopes,
				"claimsToSuppress": claimstoSuppress,
			},
		},
	}

	return event, nil
}
Setup AWS Amplify for Your Mobile App
Now let’s dive into setting up AWS Amplify with Cognito for your mobile app. Here’s the streamlined process to integrate authentication, get user data, and control access using AWS services.
Step 1: Import Cognito into your mobile App:
In your mobile project, use Amplify CLI to import the Cognito user pool. Open your terminal and run the following command:amplify import auth
You’ll be asked what type of auth resource you want to import. Choose Cognito User Pool only:
This command will show you all the users pools
amplify import auth
Using service: Cognito, provided by: awscloudformation
? What type of auth resource do you want to import? …
  Cognito User Pool and Identity Pool
▸ Cognito User Pool only
Step 2: Choose Your User Pool:
Next, you’ll see a list of available user pools. Select the one you created earlier (e.g., homeapp-UserPool):
Cognito User Pool only
? Select the User Pool you want to import: …
homeapp-UserPool (eu-west-1_E2sbxRVot)
HomeAppUp-dev (eu-west-1_kWEFldSMI)
HomePool (eu-west-1_k1u3r5dH7)
(Type in a partial name or scroll up and down to reveal more choices)
Amplify will automatically import the associated app client and set it up for you:
Cognito User Pool 'homeapp-UserPool' was successfully imported.

Using service: Cognito, provided by: awscloudformation
✔ What type of auth resource do you want to import? · Cognito User Pool only
✔ Select the User Pool you want to import: · eu-west-1_E2sbxRVot
✔ Only one Web app client found: 'homeapp-UserPoolClient' was automatically selected.
✔ Only one Native app client found: 'homeapp-UserPoolClient' was automatically selected.
⚠️ ⚠️ It is recommended to use different app client for web and native application.

✅ Cognito User Pool 'homeapp-UserPool' was successfully imported.

Next steps:

- This resource will be available for GraphQL APIs ('amplify add api')
- Use Amplify libraries to add sign up, sign in, and sign out capabilities to your client
  application.
  - iOS: https://docs.amplify.aws/lib/auth/getting-started/q/platform/ios
  - Android: https://docs.amplify.aws/lib/auth/getting-started/q/platform/android
  - JavaScript: https://docs.amplify.aws/lib/auth/getting-started/q/platform/js
Step 2: Choose Your User Pool:
Now that Cognito is imported, push the changes to the cloud by running: amplify push
This command updates your Amplify backend with the imported Cognito settings:
 amplify push
✔ Successfully pulled backend environment dev from the cloud.

    Current Environment: dev

┌──────────┬───────────────────────┬───────────┬───────────────────┐
│ Category │ Resource name         │ Operation │ Provider plugin   │
├──────────┼───────────────────────┼───────────┼───────────────────┤
│ Auth     │ homemobileappf58f991f │ Import    │ awscloudformation │
└──────────┴───────────────────────┴───────────┴───────────────────┘
✔ Are you sure you want to continue? (Y/n) · yes
⠋ Saving deployment state...
Deployment state saved successfully.
Once the process completes, your mobile app will be connected to the Cognito user pool.
Let’s See the App in Action
Here are some key features after the integration:
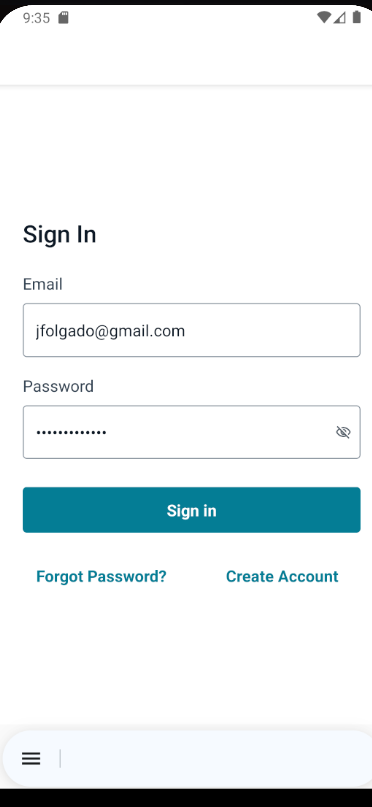
1.Login Screen Amplify provides a ready-made login page for you. Once the user logs in, Amplify handles authentication behind the scenes and retrieves the necessary tokens from Cognito.
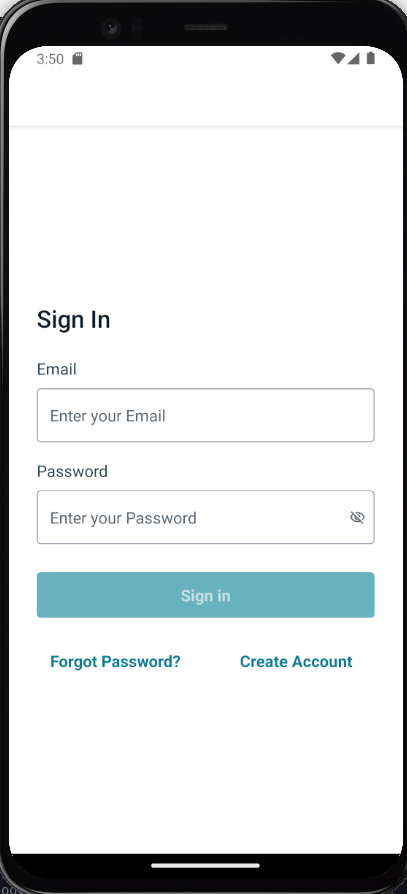
App Login
2. Home screen After logging in, the home screen is displayed, and in the top left, you can see the profile image retrieved from the /v1/profile-image endpoint (as we implemented earlier). Both buttons in the UI call the /v1/gates/control/ endpoint to publish a message on AWS IoT MQTT.
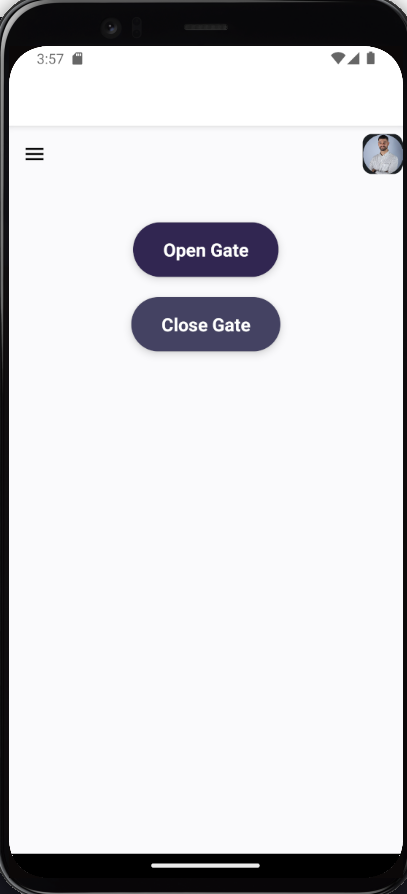
Home Screen
3. Profile Screen The profile screen displays user information such as name, email, and other details that are fetched from the Cognito ID token. This data is already available in the token once the user is authenticated.
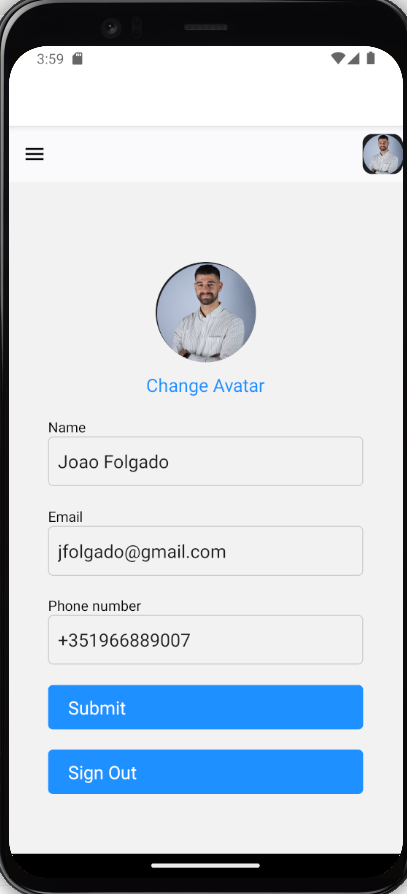
Profile Screen
Multi-Factor Authentication (MFA)
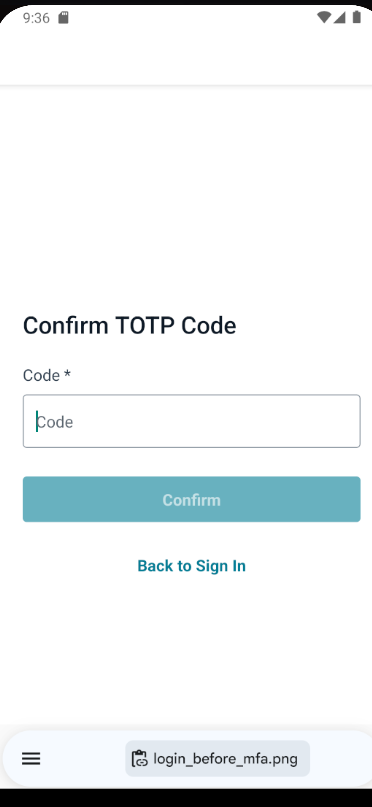
Remember that we enabled MFA during the Cognito setup? After logging in, the user is prompted to provide their MFA code to complete the sign-in process. Here’s what it looks like:
Login
Once the user enters the code, they can successfully complete the login process and gain access to the app.
Mfa code request

Home page
Recap
And that’s it! You’ve successfully integrated AWS Amplify with your mobile app, using Cognito for authentication, profile management, and security features like MFA. The login, home, and profile screens are working seamlessly with our API and AWS IoT Core.
With this setup, your app is ready to scale securely and efficiently! 🎉